In this tutorial we’ll walk you through the following steps to create and setup your new Stiddle account and Worksapce:
Setting Up Your New Account & Workspace ~ Complete Setup Guide
- Go to stiddle.com/book-demo.
- Creating an account
- Creating your first Workspace
- Understanding Workspace based billing
- Inviting Workspace Team Members
- Integrating Connectors - Shopify, Facebook Ads, Google Ads
- Installing the Stiddle Pixel
- Setting up ad tracking UTM parameters with existing and new ads
Learn How To Use Stiddle Effectively ~ Complete Features Guide
- Configuring Campaign Manager (tips & tricks)
- Creating a new Analytics Dashboard
- Configuring the Analytics Dashboard (tips & tricks)
- Sharing the Analytics Dashboard
- Everything you need to know about Stiddle People Profiles
- Creating a new audience
- Everything you need to know about Audiences
- Workspace vs. account settings (inviting your team members)
- Using Stiddle for agencies (billing, white-label, collaborate, organize)
Setting Up Your New Account & Workspace
Follow the steps below to get your account setup to start using Stiddle.
Signup
Go to stiddle.com/book-demo to book a demo. Follow the account signup and onboarding questions to create your account. You'll be requested to verify your email at signup ~ if you need to resend your verification email, please click here.
Create your first Workspace
What are Stiddle Workspaces? Stiddle was built with collaboration and organization in mind - that’s why Stiddle is divided into Workspaces. Think of Workspaces like folders, folders you can share with your team.
You can create different folders for each of your brands or agency clients to keep your data separate. With each new Workspace you create in Stiddle, you’ll need to pick a plan.
Creating your new Workspace After signing up for your new Stiddle account, you'll land on the "Workspaces" page, select the “New Space” button in the top right hand corner or navigate to the left hand menu -> hover over the workspace icon -> select “New Space” to get started.
Follow the prompts to name your new workspace and upload an image or logo for the workspace. Workspace images should be unique to each workspace and can be used to white-label dashboard reports when sharing with colleagues and clients (we'll go over this more later in this guide).
Understanding Workspace Based Billing
Every Workspace created in Stiddle has it's own billing and plan associated with it. When creating a new Workspace in your Stiddle account, you'll be required to select a plan and billing method. For Stiddle's pricing, visit stiddle.com/pricing.
How Pricing and Billing Works Every Workspace is billed on a usage based system. We call this metric MAP (Monthly Active Profile) ~ the number of unique website visitors that have active activity during a monthly billing period. Or AAP (Annual Active Profile) for annual billing periods.
Building your Plan When building a plan for your Workspace, you'll have a few options to consider: which billing cycle is right for me?, what is my MAP?. The easiest way to find you MAP is checking your existing website analytics. Checking the total unique visitors for the month is usually a good way of estimating your MAP.
Note that Stiddle doesn't count imported profiles or Shopify order data toward your MAP (or AAP for annual plans).
Remember, it's not a big deal if you underestimate your MAP, Stiddle will continue tracking your profiles, then report the overage difference at the end of your billing cycle.

On annual plans, your MAP (Monthly Active Profiles) will become bundled together and defined as AAP (Annual Active Profile), these are stacked up for the fiscal year, instead of being counted on a monthly basis like MAP (Monthly Active Profiles), allowing you to roll MAP credits over when they're not being used.
How Does Overage Work? When building a plan, you have the option to select how many MAP (or AAP) you predict to have during your billing cycle ~ giving you a price estimate for your plan. You'll be charged at a discount for the number of MAPs selected at the time of building your plan. However, if Stiddle tracks over the MAP (or APP) you've selected for your plan, you'll be billed at an overage rate. Each additional MAP will be billed at a rate of $10 USD per 1,000 MAP per month.
For example, when building your plan for a new Workspace, you predict your MAP (Monthly Active Profiles) will be no more than 20,000. You move the slide to 20,000 MAP and confirm your billing. At the end of the month you've noticed a spike in website traffic, Stiddle's tracked 30,000 MAP. In this case, at the end of the billing cycle, you'll be billed the difference of 10,000 MAP, or $100 USD.
Updating Billing Methods By Workspace At anytime you can update your Workspace billing method. Remember, each Workspace you create has it's own billing method and plan associated with it. To update your billing method, navigate to the left hand menu, select "Settings" -> "Billing & Plan". Remember that only Workspace owners can access "Billing & Plan" settings.

For Agencies ~ Billing Clients For Workspaces As an agency using Stiddle, Workspaces are a great way to keep track of client data with separate billings. We recommend two different ways of billing a client for using Stiddle.
- Create the Workspace under your agency's Stiddle account, then add the client's billing method in "Billing & Plan" as a default payment method.
- Have the client create their own Stiddle account and Workspace. When they create their new Workspace, they can add their own payment method and select the appropriate plan. Then have the client add your agency's Stiddle account as a Workspace Team Member under "Space Settings" (we'll go over this more later in this guide).
Using a Coupon Code If you have a coupon code you can apply it when building your Workspace plan. To do so, simply select the "Coupon" button to the right of the "Build Your Plan" selector page. Enter the code, and select "apply". You'll then see the coupon discount added to your billing subtotal.


Checking Current Usage At anytime you can navigate to your "Settings" -> "Billing & Plan" -> "Current Usage" -> "See Breakdown Details" to view your Unique Known MAP (or AAP) and Unique Anonymous MAP (or AAP). Overage is displayed at the top of the "Billing & Plan" screen under "Current Plan" if applicable. Current usage and overage will reset at the end of your billing cycle.

Upgrading My Plan You can upgrade your Workspace plan at anytime by navigating to your Settings -> "Billing & Plan" -> "Upgrade Plan". You'll be prompted to upgrade your plan with options to select a higher MAP (or AAP) and to change your billing cycle to Annual. Please note that once on an annual billing cycle, you can't change to monthly until your current billing period is up.

Invite your team members
Now that your workspace is created, you can add team members a few different ways. Remember that when inviting team members to a workspace, they will only have access to the specific workspace you grant access to.
Ways To Share Team Access
- Navigate to the top right corner of your dashboard, select your account profile image. Simply click “Collaborate with others” to add new collaborators to your workspace. Keep in mind that adding new members this way default to the workspace you currently have enabled. To enable a different workspace, simply click on the workspace you’d like to enable from the “All Spaces” page or navigate over to your left hand navigation, hover over your workspace icon, and select the workspace you’d like to enable.
- Select the workspace you want to enable, then navigate to the left hand navigation and select “Settings”. Once in the workspace settings, select “Space” and scroll down to the “Space Members” section where you can invite new team members and clients.
- Navigate to “All Spaces”, select the settings icon associated with the workspace located in the top right hand corner. This will take you to the workspace settings, where you can invite new team members.
Now that you know where to invite new members to your workspace, you need to know which permissions to give. This allows you to share access and features within your Stiddle workspace with the people that need access and limit the access to others.
Permissions Include:
- Stiddle Pixel - Allow team members to access the Stiddle Pixel script. This is a great way to share your Stiddle Pixel code with developers, so they can add the Pixel Script on your website.
- Profiles - Allow team members to view all of the visitor and customer profiles that are created and tracked using Stiddle’s Identity Resolution.
- Analytics Dashboards - Give team members access to create new and edit existing analytics dashboards.
- Connectors - Allow team members to connect and configure new and existing connectors.
- Campaign Manager - Give team members access to view and manage campaign data within the Campaign Manager.
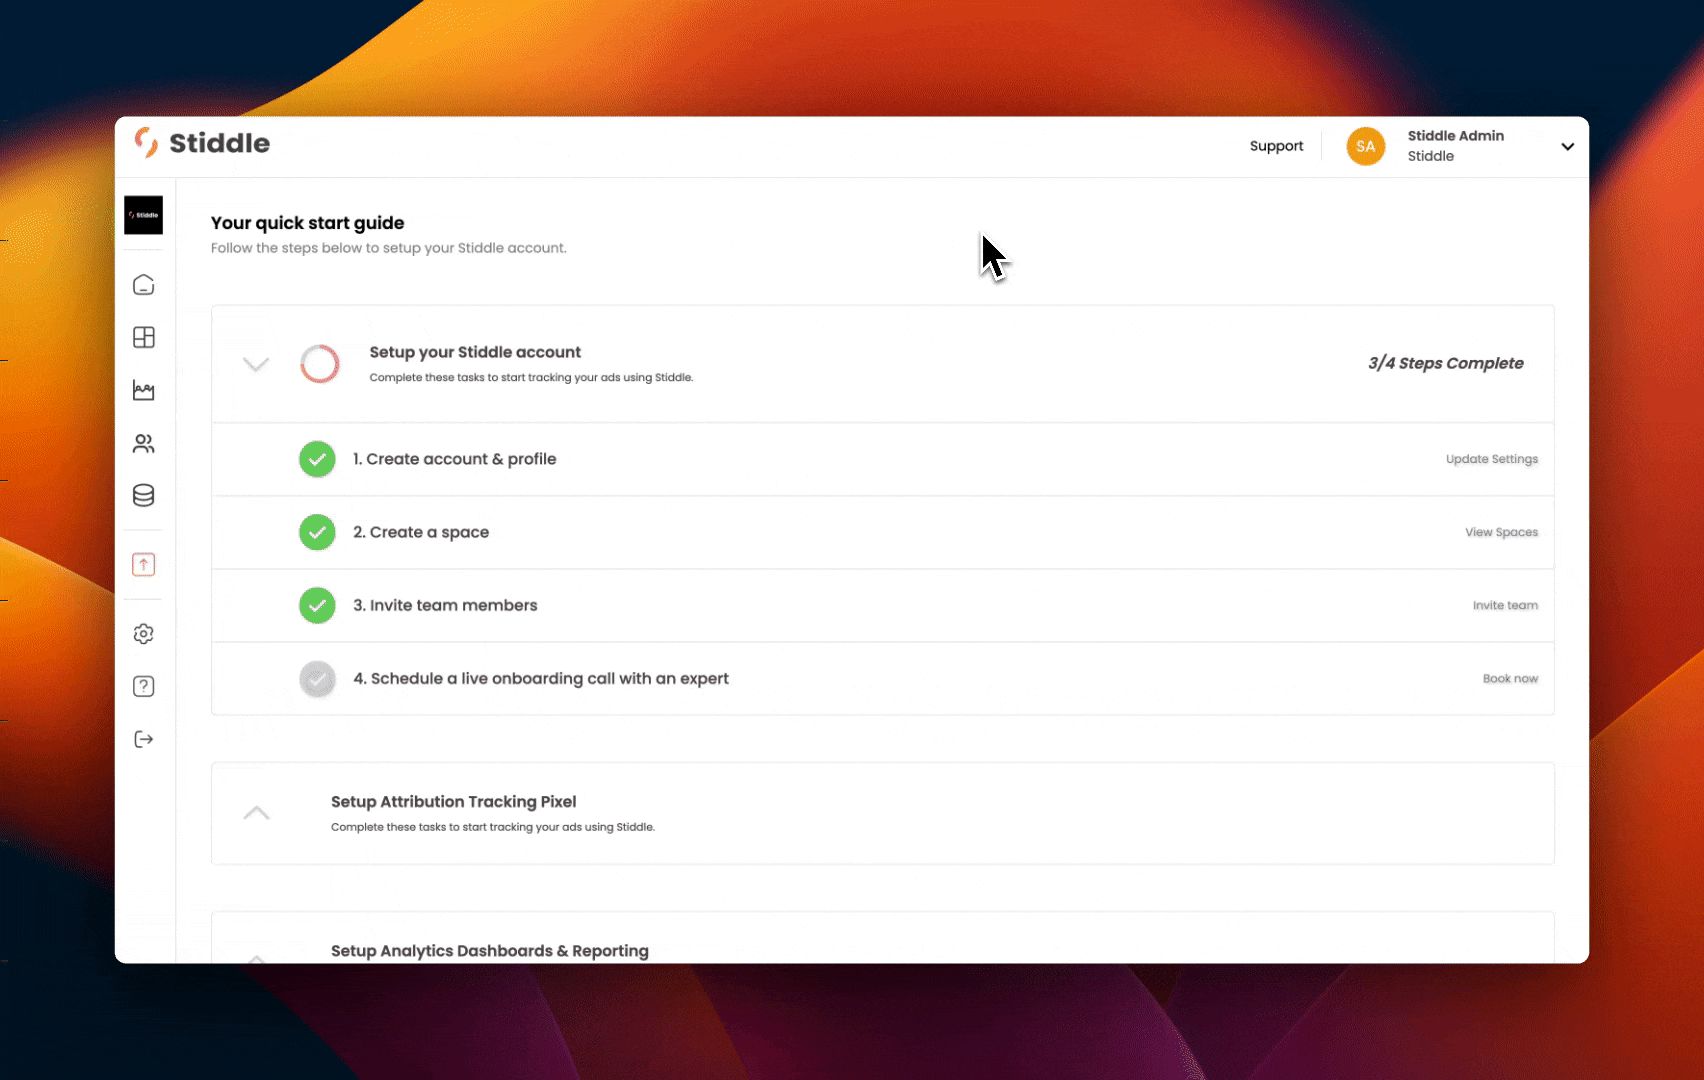
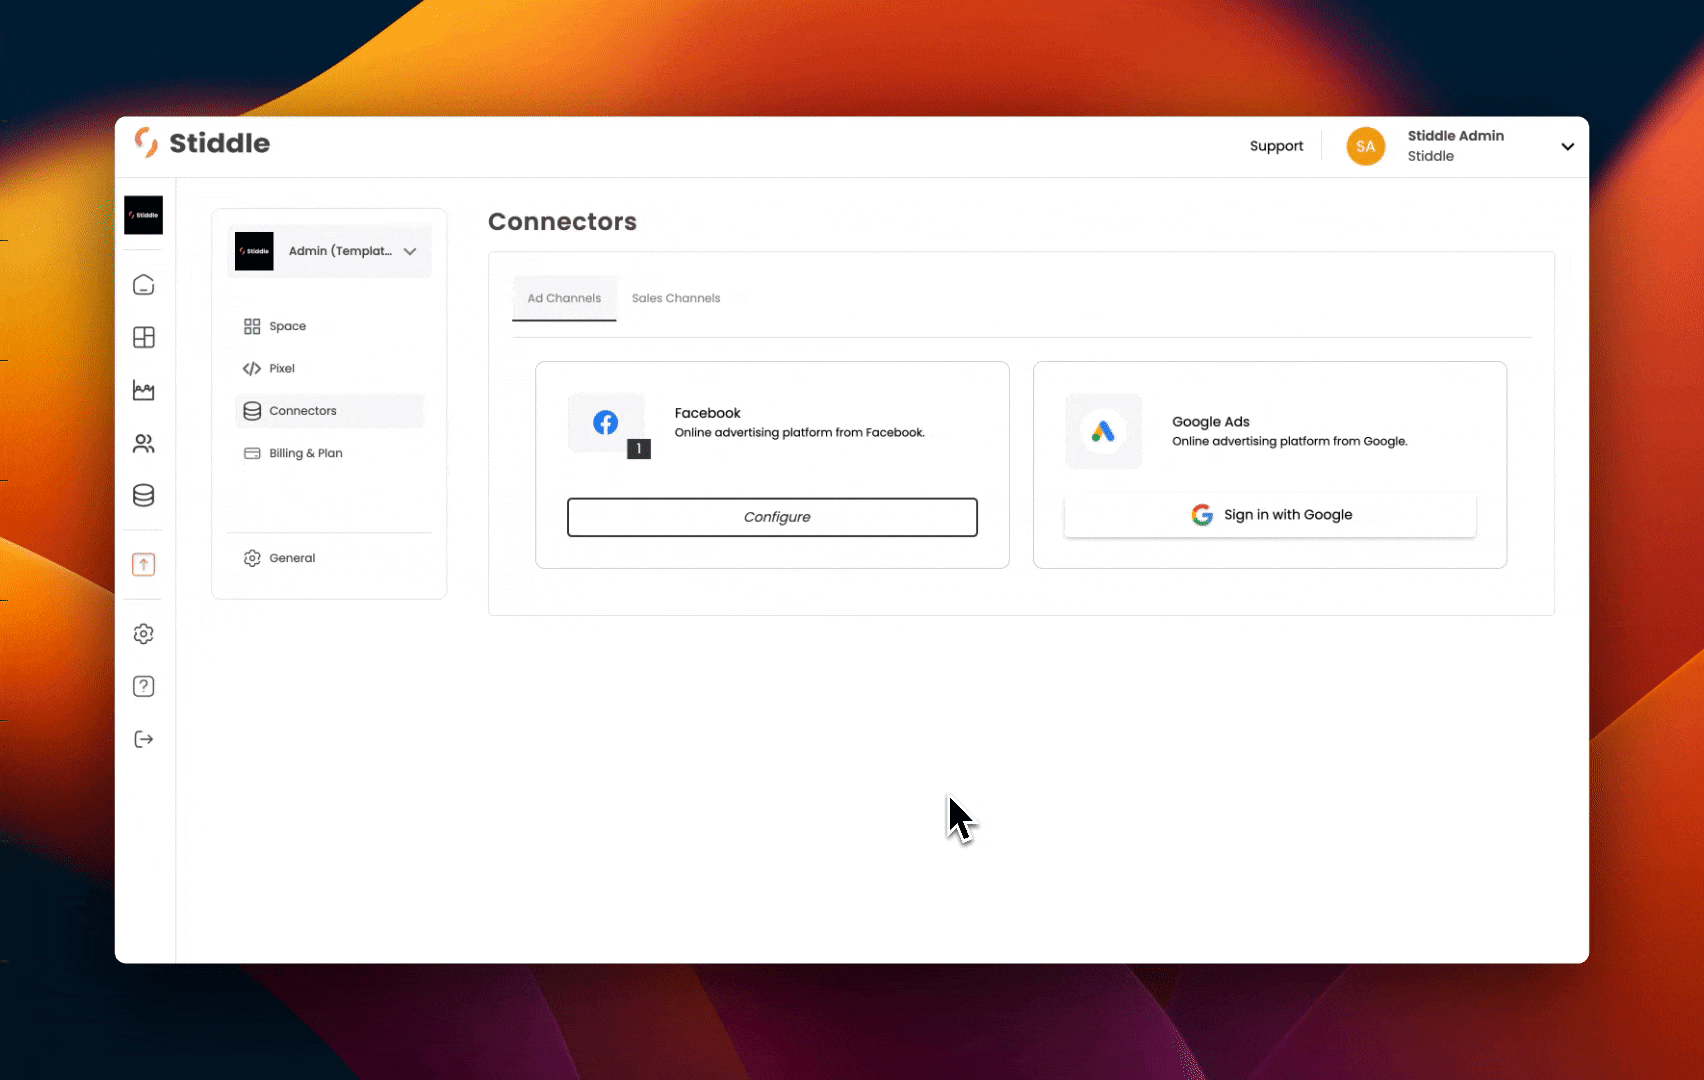
Integrate your connectors
Start connecting your data to Stiddle.
Different Connector Types
- Sales Connectors - Where a conversion or sale takes place. Such as an online store like Shopify, form builder, or payment provider.
- Ad Connectors - Advertising platforms that send paid traffic to your website. Such as Facebook and Google ads.
- Destination Connectors - Advertising, marketing, or data warehouses that you want to sync Stiddle data out to, like Klaviyo or Facebook Ads. These are also known as audiences.
You can find a list of all the current connectors Stiddle offers here. We are always releasing new connectors on a regular basis. If there is a connector you need that you don’t see, you can contact us here to request it - free of charge.

Connecting Shopify to Stiddle
Connect Shopify to Stiddle to start syncing your Shopify data for a single source of truth with purchase tracking, attribution, identity resolution, and analytics.
Connecting The Shopify App
To connect Shopify, select the workspace you want to connect to. Once selected, navigate to the workspace settings and select “Connectors”.
Select “Sales Channels”, find Shopify, then select “Connect To Stiddle”.

Paste your Shopify store URL, this is the URL Shopify provides you when creating a new Shopify store - this is NOT your custom domain.
Not Correct:
mystore.comCorrect:
mystore.myshopify.comFollow the instructions on the screen to complete the integration with Shopify and Stiddle. Make sure to provide access to all of the required permissions requested by Stiddle.
Syncing Past Customer Orders
Next you'll need to sync all of your previous order data from Shopify, there are a few ways to accomplish this. Shopify stores with large order history (over 2,000 orders) will need to upload orders manually using a CSV ~ see method two below. If you have less than 2,000 orders in your Shopify store, method one will sync automatically without the need for any manual CSV upload. We don't recommend skipping this step, skipping this step will restrict the use of Shopify metrics in your Analytics Dashboards and Profiles.
1. Syncing Past Customer Orders - Under 2,000 Orders
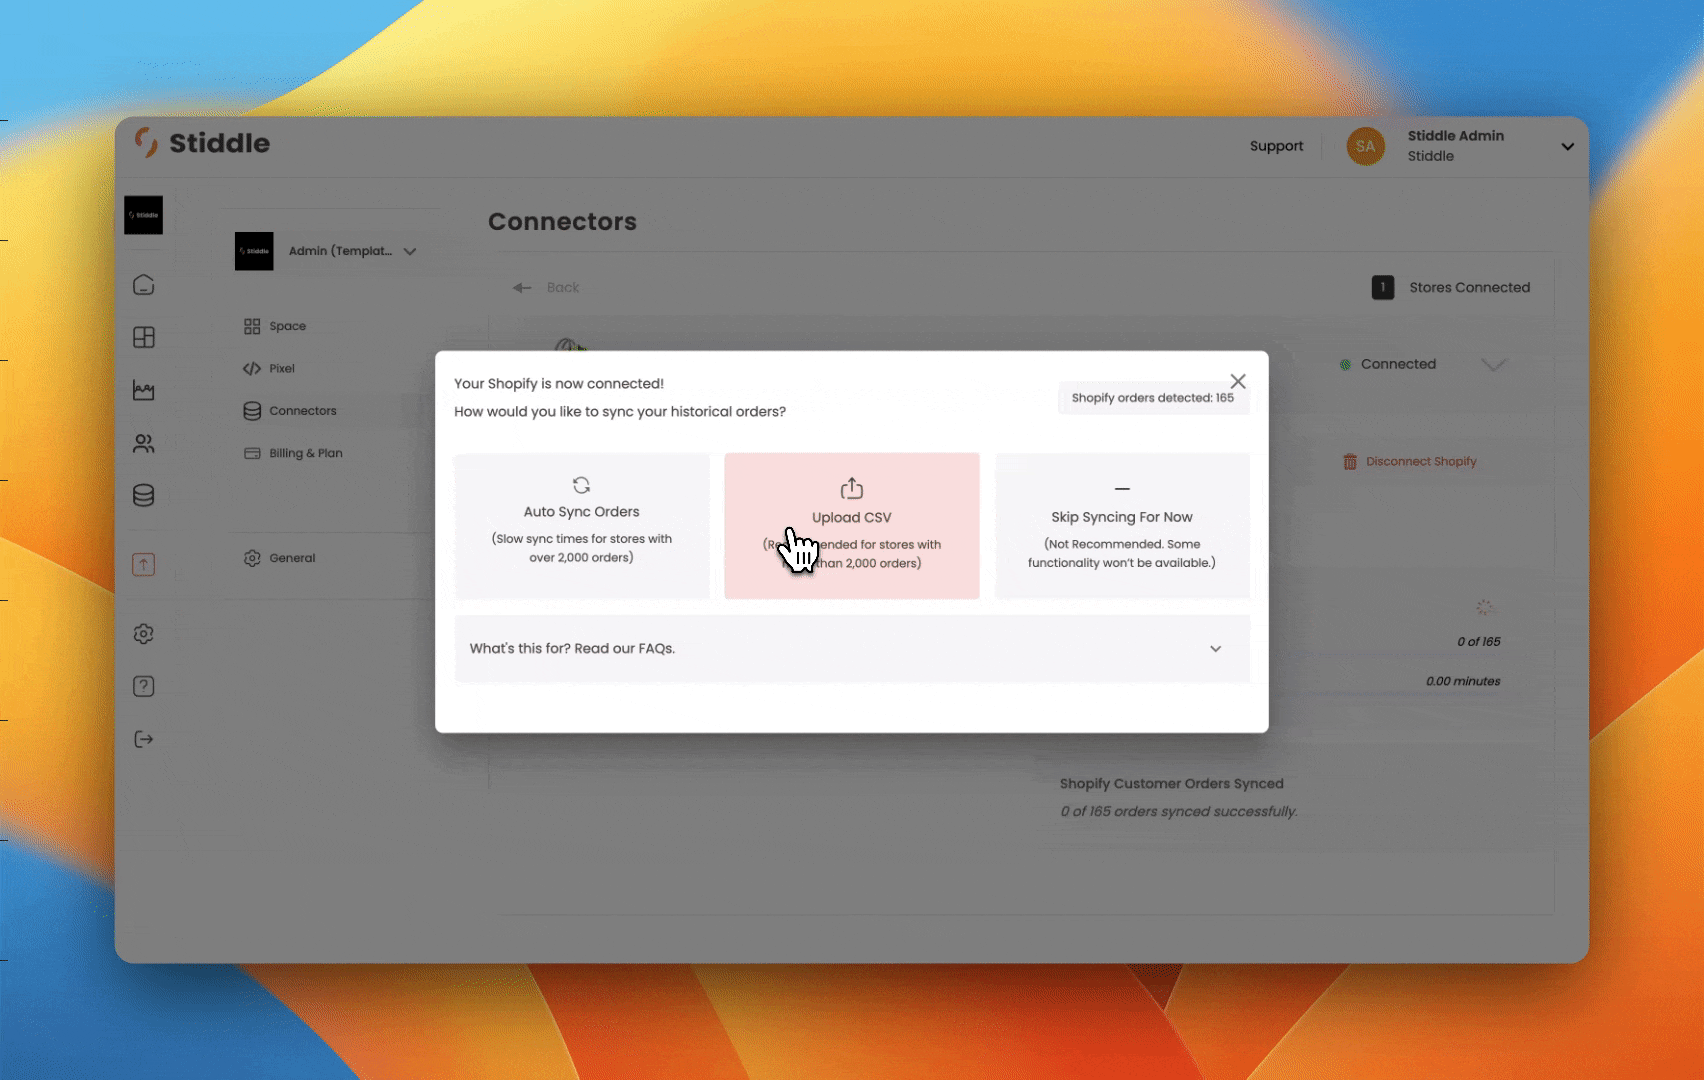
2. Uploading Past Customer Orders Using CSV - Over 2,000 Orders
Setting Up Order Return Tracking
Use Stiddle's refund webhook to track Shopify order returns in Stiddle. This allows you to track and update refunds in Stiddle Profiles. Stiddle will also automatically calculate ROAS, CV, net profit, and other attribution related metrics using the refund webhook. The refund webhook is very easy to setup with Shopify. Follow the below video for setup instructions.

Important Note Please note that only one Shopify store can be connected per Workspace. If you need to track additional Shopify stores, please create a new workspace then connect and set up Shopify tracking accordingly.
Re-syncing Shopify At anytime you can re-sync Shopify data with Stiddle, without disconnecting the integration. Remember that when re-syncing your Shopify data, Stiddle will begin to re-sync all of your previous order history. Sync times vary depending on the amount of data.
Stiddle syncs with Shopify on a daily basis, in addition to syncing new data when your browser is refreshed. This prevents the need for frequent manual re-syncs. That being said, we don't recommend doing this often.

Connecting Facebook to Stiddle
Connect Facebook to Stiddle to start syncing your campaign, ad set, and ads data for a single source of truth with purchase tracking, attribution, identity resolution, and reporting.

Getting Started
To connect Facebook, select the workspace you want to connect to. Once selected, navigate to the workspace settings, then select “Connectors”.
Select “Ad Channels”, find Facebook, then select “Connect To Stiddle”.
Follow the instructions on the screen to complete the integration with Facebook and Stiddle. Make sure to provide access to all of the required permissions requested by Stiddle.
Once connected, you’ll see a list of all your Facebook ad accounts. Begin syncing Facebook with Stiddle by selecting one of the ad accounts.

You can also easily disconnect a Facebook ad account, however you will need to have an ad account actively connected to use most features. We don't recommend frequently switching between ad accounts, as this can cause issues with campaign tracking.

Important Please note that only one ad account can be selected per workspace. Once connected, your Facebook data will sync with Stiddle. If you need to track and manage additional Facebook ad accounts, please create a new workspace then connect and select your ad account, and set up tracking accordingly.
Connecting Google Ads to Stiddle
Connect Google Ads to Stiddle to start syncing your campaign, ad group, and ads data for a single source of truth with purchase tracking, attribution, identity resolution, and reporting.
Getting Started
To connect Google, select the workspace you want to connect to. Once selected, navigate to the workspace settings, then select “Connectors”.
Select “Ad Channels”, find Google Ads, then select “Connect To Stiddle”.
Follow the instructions on the screen to complete the integration with Google Ads and Stiddle. Make sure to provide access to all of the required permissions requested by Stiddle.
Important Once connected, you’ll see a list of all your Google ad accounts. Begin syncing Google with Stiddle by selecting one of the ad accounts. Please note that Stiddle doesn't support Google Manager (MCC) accounts. You'll need to get access to the ad account directly, then connect Google to Stiddle.

Important Please note that only one ad account can be selected per workspace. Once connected, your Google Ads data will sync with Stiddle. If you need to track and manage additional Google ad accounts, please create a new workspace then connect and select your ad account, and set up tracking accordingly.
Installing The Stiddle Pixel With Shopify
The Stiddle Pixel helps track and identify visitors from your site. This is required for accurate attribution and identity resolution. Please make sure to follow the steps exactly as they are described below. If set up incorrectly, Stiddle won’t be able to track and identify your customers - resulting in inaccurate ad tracking.
At any point during setup you face issues or have questions with setup, please don’t hesitate to contact one of our support team members - we’re here to help!
Getting Started
To find your Stiddle Pixel, select the workspace you want to enable and set up the pixel for. Once selected, navigate to the left hand navigation, select “Settings” and select “Pixel”.

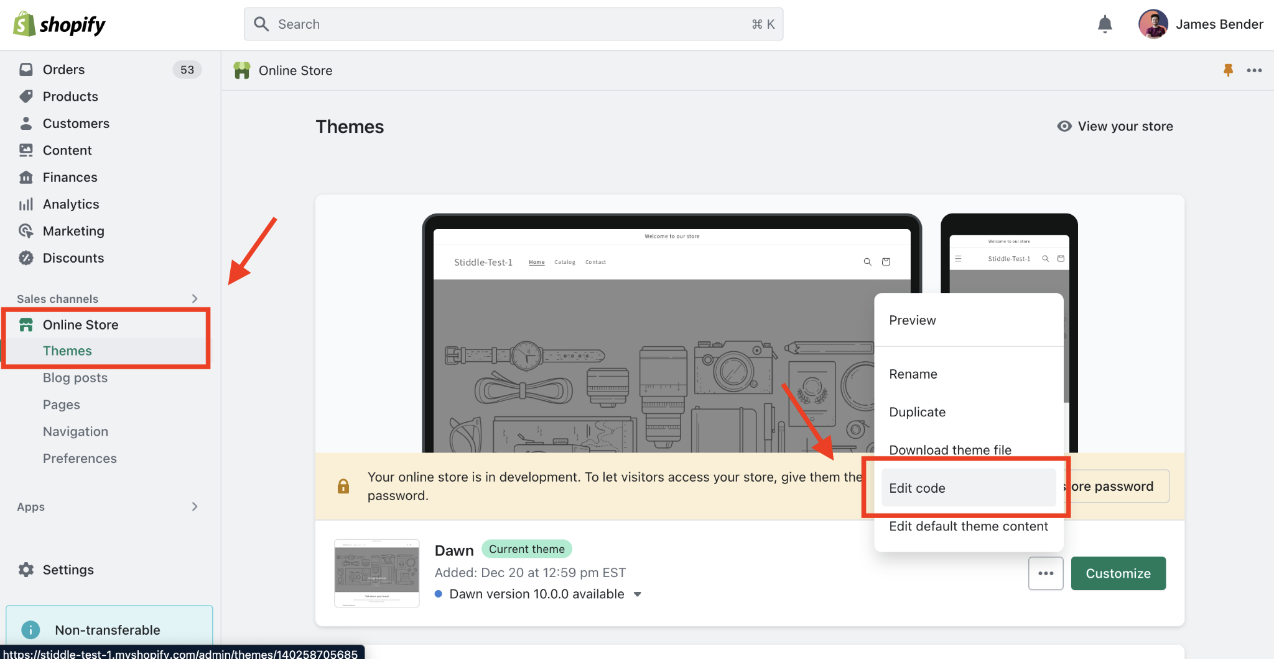
Start by copying the “Base Code” of the Stiddle Pixel and navigate to your Shopify store dashboard. Select “Online Store” from the left hand navigation, then navigate to “Themes”. Select the three dot menu, then select “Edit Code”.
Once in the Shopify code editor, navigate to the left hand menu and select “theme.liquid” - this is stored under the “layout” folder.
Scroll down to the bottom of the page and paste your copied Stiddle Pixel code into the file right above the closing </body> tag.
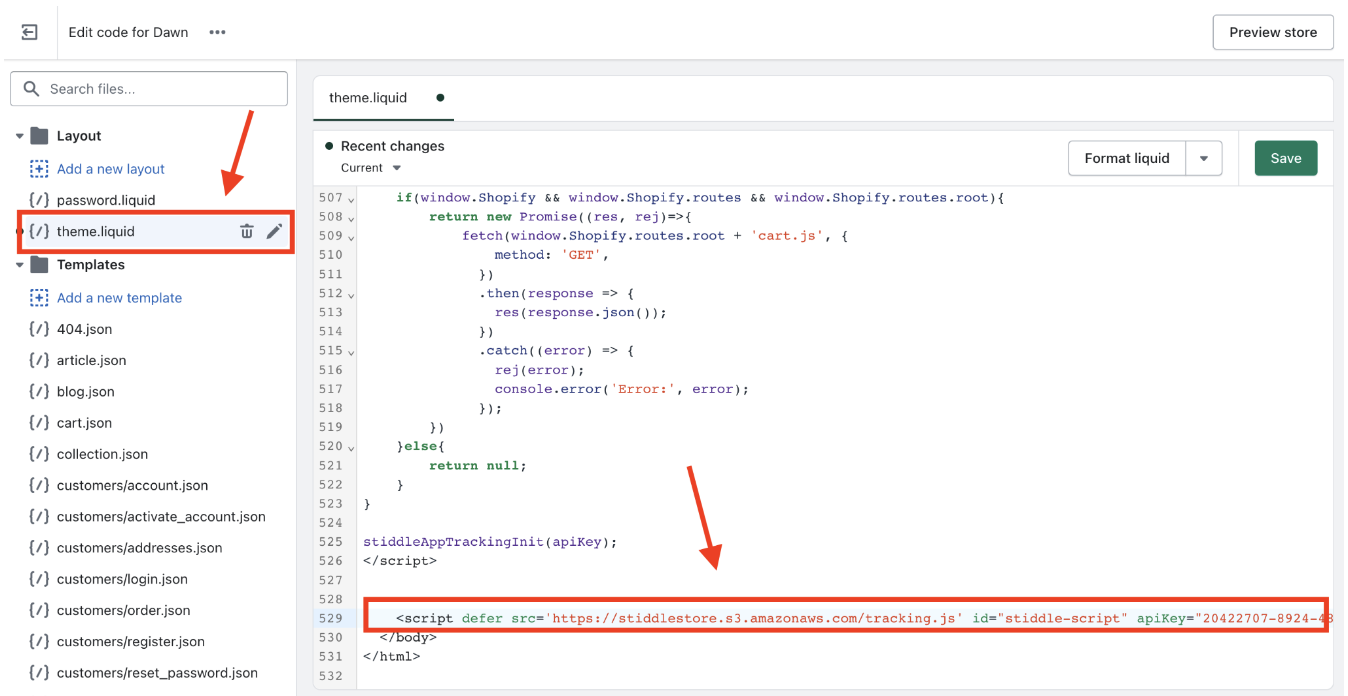
Make sure to save your changes.
Installing The Stiddle Pixel Checkout With Shopify
Once the Stiddle Pixel is installed in the theme.liquid file and the Shopify integration is connected, you'll need to install the Stiddle Pixel in Shopify checkout. There are two methods to add the Stiddle Pixel to Shopify checkout. We recommend the first method, as the second will deprecated soon. You DO NOT need to install both methods, only choose one.
Method 1: Adding The Stiddle Pixel To Customer Events (RECOMMENDED)
After adding the Stiddle Pixel to your theme.liquid website file (see instructions above), you'll need to install the Stiddle Pixel in checkout. Installing the Stiddle Pixel in checkout allows Stiddle to track conversions being made on site.
To get started, login to your Shopify account, then navigate to the "Settings" tab at the bottom left of your account.

Next, select the "Customer Events" tab, found on the left hand menu.

Select the "Add Custom Pixel" button.

Then name the Pixel "Stiddle Pixel". Select "Add Pixel".

Under "Customer Privacy", select the "Permission" and "Data Sale" dropdown.

Select "Not Required" option for "Permission" dropdown and "Data collected does not qualify as data sale" for "Data Sale" dropdown.

Next, copy and delete the existing commented out code under the "Code" section.


Copy the following code template below and paste the API key found at the beginning of the template below with the API key found within your Stiddle account - this can be found under "Pixel Settings" - see steps below to find.

Copy the below Pixel script and replace with your Stiddle API key.
const apiKey="PASTE YOUR STIDDLE API KEY HERE",DOMAIN="https://api.stiddle.com/api/v1/contacts/track",APP_URL="https://cloudflare-cors-anywhere.james-725.workers.dev/?"+encodeURIComponent("https://api.stiddle.com/api/v1/contacts/track");function loadScript(e,t){var a=document.createElement("script");a.type="text/javascript",a.src=e,a.onload=t,a.onreadystatechange=function(){"complete"===this.readyState&&t()},document.head.appendChild(a)}async function getSessionDetails(){let e=await browser.sessionStorage.getItem("session_id");if(e){let t=Date.now(),a=(t-Number(e))/1e3;if(a>28e3){let o=Date.now();return browser.sessionStorage.setItem("session_id",o),Number(o)}return Number(e)}{let r=Date.now();return browser.sessionStorage.setItem("session_id",r),Number(r)}}function generateRandomId(e){let t="ABCDEFGHIJKLMNOPQRSTUVWXYZabcdefghijklmnopqrstuvwxyz0123456789",a="";for(let o=0;o<e;o++){let r=Math.floor(Math.random()*t.length);a+=t.charAt(r)}return a}function getDevices(e){let t=e?.context?.window?.innerWidth;return t<768?"Mobile":t>=768&&t<992?"Tablet":"Desktop"}async function getIpAddress(){var e={method:"GET",redirect:"follow"};return new Promise(async(t,a)=>{await fetch("https://ipapi.co/json",e).then(e=>e.json()).then(e=>{t({ip:e.ip,location:{...e,platform:navigator.userAgent,os:navigator.platform}})}).catch(e=>{console.log("error",e),a(null)})})}const extractParamsFromUrl=e=>{let t=decodeURIComponent(e?.context?.window?.location?.href),a=new URL(t),o=new URLSearchParams(a.search),r={};for(let n of o.keys())r[n]=o.getAll(n);return r},commonKeys={stiddleID:"stiddleId",eventId:"eventId",contact_email:"c_email",cartToken:"cartToken",visit:"visit",click:"click",loadContent:"DOMContentLoaded",submit:"form_submit",socket:"socket"};class EventTracker{constructor(){this.serverUrl=APP_URL}createNewEventId(){let e=generateRandomId(10);return browser.localStorage.setItem(commonKeys.eventId,e),e}getEventId(){return browser.localStorage.getItem(commonKeys.eventId)}async generateEventPayload(e){return e?.data?.checkout,{eventType:commonKeys.visit,content:e.context?.window?.location?.host,shop:e.context?.window?.location?.host,checkout:getCheckoutDetails(e),uId:await eventTracker.getKeysFromLocalstorage(commonKeys.stiddleID),cartToken:await eventTracker.getKeysFromLocalstorage(commonKeys.cartToken),pageUrl:e?.context?.window?.location?.href,triggeredAt:Date(),session:await getSessionDetails(),referrer:"https://"+e.context?.window?.location?.host+"/",device:getDevices(e),event_time:e?.timestamp,apiKey}}async createEvent(e){this.passEvents({...await this.generateEventPayload(e),event_id:this.createNewEventId()},e)}passEvents(e,t){let a={...e};if(e?.uId)this.requestToServer(a,t);else{let o=Date.now().toString(36)+Math.random().toString(36).substr(2);this.createAndSaveNewStiddleID(o),this.requestToServer({...a,uId:o},t)}}async retriveUtmParams(e){let t=extractParamsFromUrl(e);if(Object.keys(t).length)await browser.localStorage.setItem("utm_params",JSON.stringify(t));else try{let a=await browser.localStorage.getItem("utm_params");if(a)return JSON.parse(a)}catch(o){console.error("Error retrieving UTM params:",o)}return t}async requestToServer(e,t){try{let a=await getIpAddress(),o={...e,cartItems:0,cartData:init.data.cart,utmParams:await this.retriveUtmParams(t),pathname:t?.context?.document?.location?.pathname,c_email:await browser.localStorage.getItem(commonKeys.contact_email),...a},r="https://"+t?.context?.window?.location?.host;var n=new XMLHttpRequest;n.open("POST",APP_URL),n.setRequestHeader("Content-Type","application/json;charset=UTF-8"),n.setRequestHeader("Access-Control-Allow-Origin",r),n.onload=function(){let e=JSON.parse(this.response);e&&e.data&&browser.localStorage.setItem(commonKeys.stiddleID,e.data)},n.send(JSON.stringify(o))}catch(s){console.log(s)}}async getKeysFromLocalstorage(e){let t=await browser.localStorage.getItem(e);return t}createAndSaveNewStiddleID(e){browser.localStorage.setItem(commonKeys.stiddleID,e)}async passSocketEvents(e){let t=await io("https://apptesting-tracking.stiddle.com");t.emit("contact-event",e)}}const eventTracker=new EventTracker;class FormSubmissions{retriveForms(){let e=document.getElementsByTagName("form");for(let t=0;t<e.length;t++){let a=e[t];a.addEventListener("submit",e=>{e.preventDefault(),this.retriveFormsData(e)})}}async retriveFormsData(e){let t=e.target,a=new FormData(t),o={selector_id:t.id};for(let r of a.keys())!r.includes("password")&&(o[r.toLowerCase()]=a.get(r));eventTracker.passEvents({eventType:commonKeys.submit,content:window.location.href,uId:await eventTracker.getKeysFromLocalstorage(commonKeys.stiddleID),pageUrl:window.location.href,triggeredAt:Date(),shop:window.location.hostname,session:await getSessionDetails(),formData:{...o,form_id:Date.now()},apiKey},e)}}const formSubmission=new FormSubmissions,stiddleAppTrackingInit=e=>{analytics.subscribe("checkout_completed",async e=>{await eventTracker.createEvent(e)})},getCheckoutDetails=e=>{let t=e?.data?.checkout;return t?(browser.localStorage.setItem(commonKeys.contact_email,t.email),{token:t.token,cart_token:eventTracker.getKeysFromLocalstorage(commonKeys.cartToken),order_id:t.order?.id,currency:t.currencyCode,total_price:t.totalPrice?.amount,total_tax:t.totalTax?.amount,discount:t.discountsAmount?.amount,customer:{email:t.email,phone:t.phone,first_name:t.billingAddress.firstName,last_name:t.billingAddress.lastName,country:t.billingAddress.country,country_code:t.billingAddress.countryCode,city:t.billingAddress.city,address:t.billingAddress.address1+" "+t.billingAddress.address2,province:t.billingAddress.province,province_code:t.billingAddress.provinceCode,zipCode:t.billingAddress.zip},items:t.lineItems.map(e=>({id:e.id,product_id:e.variant.product.id,name:e.title,price:e.finalLinePrice.amount,quantity:e.quantity,image:e.variant.image.src}))}):null};function modifyCartData(e){return e&&e.items&&e.items.length?e.items.map(e=>({name:e.title,image:e.image,price:e.price,final_price:e.final_price,quantity:e.quantity,product_id:e.product_id,total_discount:e.total_discount,total_price:e.final_line_price})):null}async function getCartItemsDetails(e){return e?new Promise((e,t)=>{fetch("/cart.js",{method:"GET"}).then(t=>{e(t.json())}).catch(e=>{t(e),console.error("Error:",e)})}):null}stiddleAppTrackingInit(apiKey);Finding Your Stiddle API Key
To find your Stiddle API key navigate to your Stiddle account, hover over "Data" in the left hand menu, then select "Stiddle Pixel".

Copy the Stiddle Pixel code from Step 1, under "Base Code".

It will look something like this:
<script type="text/javascript" defer src='//tracking.stiddlepixel.com/' id="stiddle-script" apiKey="fec3cfd1-e8c1-463b-b42a-02e8f76f8cf1"></script>Copy the "apiKey" from your Stiddle Pixel code.

Lastly, paste your Stiddle API key into the Stiddle Pixel Checkout Script template. Make sure not to remove the quotation marks within the script - copy and paste only the API key digits.

It will look something like this.
const apiKey="fec3cfd1-e8c1-463b-b42a-02e8f76f8cf1",DOMAIN="https://api.stiddle.com/api/v1/contacts/track",APP_URL="https://cloudflare-cors-anywhere.james-725.workers.dev/?"+encodeURIComponent("https://api.stiddle.com/api/v1/contacts/track");function loadScript(e,t){var a=document.createElement("script");a.type="text/javascript",a.src=e,a.onload=t,a.onreadystatechange=function(){"complete"===this.readyState&&t()},document.head.appendChild(a)}async function getSessionDetails(){let e=await browser.sessionStorage.getItem("session_id");if(e){let t=Date.now(),a=(t-Number(e))/1e3;if(a>28e3){let o=Date.now();return browser.sessionStorage.setItem("session_id",o),Number(o)}return Number(e)}{let r=Date.now();return browser.sessionStorage.setItem("session_id",r),Number(r)}}function generateRandomId(e){let t="ABCDEFGHIJKLMNOPQRSTUVWXYZabcdefghijklmnopqrstuvwxyz0123456789",a="";for(let o=0;o<e;o++){let r=Math.floor(Math.random()*t.length);a+=t.charAt(r)}return a}function getDevices(e){let t=e?.context?.window?.innerWidth;return t<768?"Mobile":t>=768&&t<992?"Tablet":"Desktop"}async function getIpAddress(){var e={method:"GET",redirect:"follow"};return new Promise(async(t,a)=>{await fetch("https://ipapi.co/json",e).then(e=>e.json()).then(e=>{t({ip:e.ip,location:{...e,platform:navigator.userAgent,os:navigator.platform}})}).catch(e=>{console.log("error",e),a(null)})})}const extractParamsFromUrl=e=>{let t=decodeURIComponent(e?.context?.window?.location?.href),a=new URL(t),o=new URLSearchParams(a.search),r={};for(let n of o.keys())r[n]=o.getAll(n);return r},commonKeys={stiddleID:"stiddleId",eventId:"eventId",contact_email:"c_email",cartToken:"cartToken",visit:"visit",click:"click",loadContent:"DOMContentLoaded",submit:"form_submit",socket:"socket"};class EventTracker{constructor(){this.serverUrl=APP_URL}createNewEventId(){let e=generateRandomId(10);return browser.localStorage.setItem(commonKeys.eventId,e),e}getEventId(){return browser.localStorage.getItem(commonKeys.eventId)}async generateEventPayload(e){return e?.data?.checkout,{eventType:commonKeys.visit,content:e.context?.window?.location?.host,shop:e.context?.window?.location?.host,checkout:getCheckoutDetails(e),uId:await eventTracker.getKeysFromLocalstorage(commonKeys.stiddleID),cartToken:await eventTracker.getKeysFromLocalstorage(commonKeys.cartToken),pageUrl:e?.context?.window?.location?.href,triggeredAt:Date(),session:await getSessionDetails(),referrer:"https://"+e.context?.window?.location?.host+"/",device:getDevices(e),event_time:e?.timestamp,apiKey}}async createEvent(e){this.passEvents({...await this.generateEventPayload(e),event_id:this.createNewEventId()},e)}passEvents(e,t){let a={...e};if(e?.uId)this.requestToServer(a,t);else{let o=Date.now().toString(36)+Math.random().toString(36).substr(2);this.createAndSaveNewStiddleID(o),this.requestToServer({...a,uId:o},t)}}async retriveUtmParams(e){let t=extractParamsFromUrl(e);if(Object.keys(t).length)await browser.localStorage.setItem("utm_params",JSON.stringify(t));else try{let a=await browser.localStorage.getItem("utm_params");if(a)return JSON.parse(a)}catch(o){console.error("Error retrieving UTM params:",o)}return t}async requestToServer(e,t){try{let a=await getIpAddress(),o={...e,cartItems:0,cartData:init.data.cart,utmParams:await this.retriveUtmParams(t),pathname:t?.context?.document?.location?.pathname,c_email:await browser.localStorage.getItem(commonKeys.contact_email),...a},r="https://"+t?.context?.window?.location?.host;var n=new XMLHttpRequest;n.open("POST",APP_URL),n.setRequestHeader("Content-Type","application/json;charset=UTF-8"),n.setRequestHeader("Access-Control-Allow-Origin",r),n.onload=function(){let e=JSON.parse(this.response);e&&e.data&&browser.localStorage.setItem(commonKeys.stiddleID,e.data)},n.send(JSON.stringify(o))}catch(s){console.log(s)}}async getKeysFromLocalstorage(e){let t=await browser.localStorage.getItem(e);return t}createAndSaveNewStiddleID(e){browser.localStorage.setItem(commonKeys.stiddleID,e)}async passSocketEvents(e){let t=await io("https://apptesting-tracking.stiddle.com");t.emit("contact-event",e)}}const eventTracker=new EventTracker;class FormSubmissions{retriveForms(){let e=document.getElementsByTagName("form");for(let t=0;t<e.length;t++){let a=e[t];a.addEventListener("submit",e=>{e.preventDefault(),this.retriveFormsData(e)})}}async retriveFormsData(e){let t=e.target,a=new FormData(t),o={selector_id:t.id};for(let r of a.keys())!r.includes("password")&&(o[r.toLowerCase()]=a.get(r));eventTracker.passEvents({eventType:commonKeys.submit,content:window.location.href,uId:await eventTracker.getKeysFromLocalstorage(commonKeys.stiddleID),pageUrl:window.location.href,triggeredAt:Date(),shop:window.location.hostname,session:await getSessionDetails(),formData:{...o,form_id:Date.now()},apiKey},e)}}const formSubmission=new FormSubmissions,stiddleAppTrackingInit=e=>{analytics.subscribe("checkout_completed",async e=>{await eventTracker.createEvent(e)})},getCheckoutDetails=e=>{let t=e?.data?.checkout;return t?(browser.localStorage.setItem(commonKeys.contact_email,t.email),{token:t.token,cart_token:eventTracker.getKeysFromLocalstorage(commonKeys.cartToken),order_id:t.order?.id,currency:t.currencyCode,total_price:t.totalPrice?.amount,total_tax:t.totalTax?.amount,discount:t.discountsAmount?.amount,customer:{email:t.email,phone:t.phone,first_name:t.billingAddress.firstName,last_name:t.billingAddress.lastName,country:t.billingAddress.country,country_code:t.billingAddress.countryCode,city:t.billingAddress.city,address:t.billingAddress.address1+" "+t.billingAddress.address2,province:t.billingAddress.province,province_code:t.billingAddress.provinceCode,zipCode:t.billingAddress.zip},items:t.lineItems.map(e=>({id:e.id,product_id:e.variant.product.id,name:e.title,price:e.finalLinePrice.amount,quantity:e.quantity,image:e.variant.image.src}))}):null};function modifyCartData(e){return e&&e.items&&e.items.length?e.items.map(e=>({name:e.title,image:e.image,price:e.price,final_price:e.final_price,quantity:e.quantity,product_id:e.product_id,total_discount:e.total_discount,total_price:e.final_line_price})):null}async function getCartItemsDetails(e){return e?new Promise((e,t)=>{fetch("/cart.js",{method:"GET"}).then(t=>{e(t.json())}).catch(e=>{t(e),console.error("Error:",e)})}):null}stiddleAppTrackingInit(apiKey);Lastly, paste the entire Stiddle Pixel script in Shopify.

Be sure to click "Save" at the top of your screen, then click "Connect" below.

If you need any help installing the script, please click the "Book an Onboarding Call" button within your "Getting Started" page in your Stiddle account or message your account manage in Slack.
Method 2: Adding The Stiddle Pixel To Additional Checkout Scripts (DEPRECATED)
This method is NOT recommended as Shopify will be deprecating the additional checkout scripts soon. However in certain cases where you don't have admin access to Customer Events, you may use this method to temporarily track checkout conversions. Keep in mind, if you decide to use this method, you will need to change to the Customer Events setup in Method 1 soon.
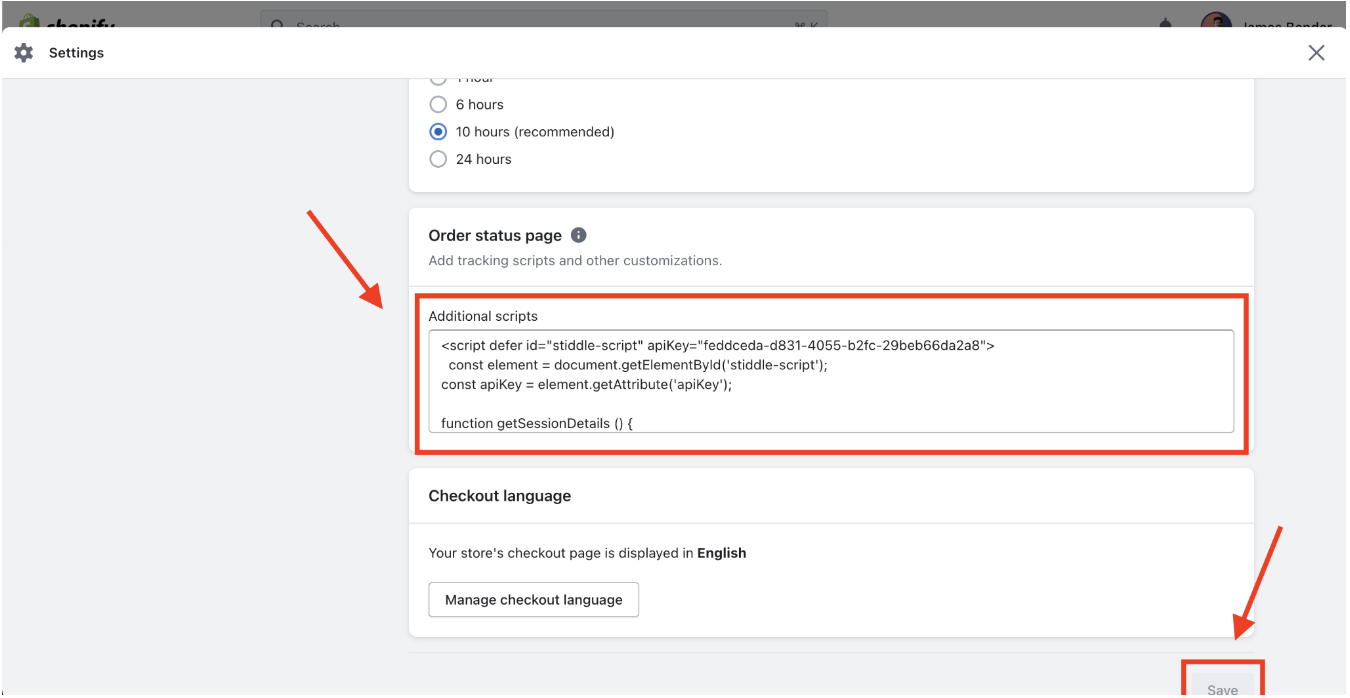
Navigate back to your Stiddle Pixel settings, copy the “Conversion Code” - from step 2.

Go back into your Shopify dashboard, select “Settings” - found on the left hand navigation. Then select the “Checkout” tab.
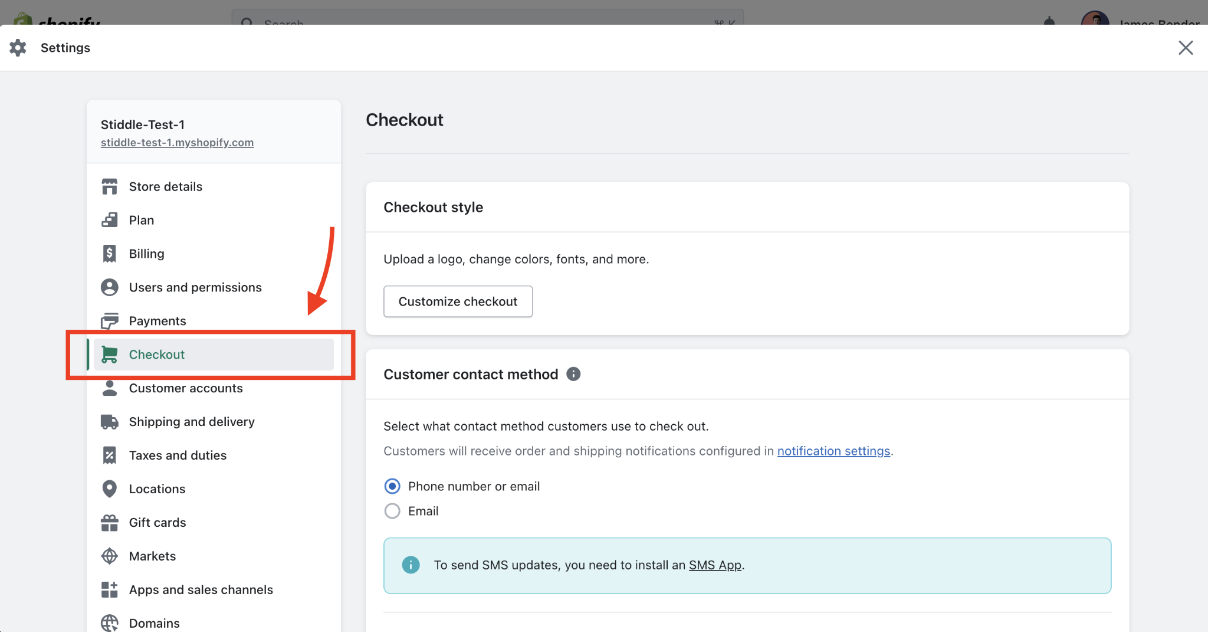
Scroll down to the “Order Status Page” section and paste your Stiddle Pixel Conversion Code, under “Additional Scripts”.
Select “Save” to save your changes.
That’s it! Your Stiddle Pixel is not installed on your Shopify store. To verify it is working and installed correctly, navigate back to your Stiddle Pixel settings page to see if the pixel status is set to “Pixel Active”.
Important Please note that the Stiddle Pixel status will only change to active status after it has identified a new visitor on your Shopify store. To test this, go into an incognito or private browser and visit your Shopify store and click around to a few pages. Navigate back to your Stiddle Pixel settings, refresh the page, and check to see if the status is now set to active.
If you are unsure of which Shopify store you have connected to Stiddle and want to see where the traffic is coming from, select the “Pixel Status” button to find more information on the status and troubleshooting.


Installing The Stiddle Pixel On Your Non-Shopify Website
Use this method to install the Stiddle Pixel on a non-Shopify website. Stiddle will automatically profile every visitor that lands on your website and track then attribute form submissions.
The Stiddle Pixel helps track and identify visitors from your site. This is required for accurate attribution and profile identity resolution. Please make sure to follow the steps exactly as they are described below. If set up incorrectly, Stiddle won’t be able to track and identify your customers - resulting in inaccurate ad tracking and profiling.
At any point during setup you face issues or have questions with setup, please don’t hesitate to contact one of our support team members - we’re here to help!
Follow the video below for instructions to install the Stiddle Pixel on your website. The most important thing to remember is where to paste the tracking code. Make sure to paste the Stiddle Pixel code in the header of your website ~ this way it is shown and fired on every page. In the below video example, you'll see us install the pixel in a few seconds onto a Webflow website.

Setting up UTM parameters with existing and new ads (required for ad attribution)
Setting up UTM parameters with your ads are required to start tracking and attributing sales with Stiddle. When using UTM parameters with your ads, Stiddle is able to identify every visitor that visits your website, then attributes them to the ad that was responsible for the visit and/or conversion. This gives you the clarity you need to understand each visitor's journey and accurately make decisions based on which ad was responsible for a conversion.
What is a UTM parameter? Why does Stiddle use them?
A UTM parameter is a small snippet of code that is added to the end of a URL, allowing you to track campaigns and other content performance.
There exist various categories of Tracking Parameters and UTMs, along with diverse methods for their implementation. The UTM Tracking Parameters we use are enhanced with Dynamic Values. In the words of Facebook, "Dynamic parameters prove advantageous as they offer an automated approach to fill in the values of your parameters, leveraging the information provided during ad setup and details associated with ad delivery."
Please make sure to follow the steps exactly as they are described below. If set up incorrectly, Stiddle won’t be able to track and identify your visitors/customers - resulting in inaccurate ad tracking.
At any point during setup you face issues or have questions with setup, please don’t hesitate to contact one of our support team members - we’re here to help!
Setup UTM parameters for Facebook Ads
There are a few different ways to add UTM parameters to your Facebook ads, please follow the directions below for correct setup.
Setting up UTM parameters for a single ad or existing ads:
If you are only running one ad or have existing ads you’d like to track using Stiddle, this is the easiest way to set up your UTM parameter tracking.
Login to your Stiddle account, select the workspace you’d like to start tracking, then navigate to your left hand menu and select “UTM Manager”.

Select “Facebook” from the top menu - you should now see your UTM parameter displayed for Facebook.
Simply copy the UTM parameter by clicking “Copy UTM”.

Recommended Stiddle UTMs For Facebook Ads
You can also copy the following UTM parameter string from below. We recommend using the first UTM parameter string with "st_". We've built our own version of "utm_" to prevent issues with existing UTM parameters you may already be using. Using "st_" ensures Stiddle is tracking every parameter string correctly, without interference.
?st_source=facebook&st_campaign={{campaign.id}}&st_adset={{adset.id}}&st_adid={{ad.id}}

OR

?utm_source=facebook&campaign={{campaign.id}}&adset={{adset.id}}&adid={{ad.id}}
Important Please note that if your ads do not contain the following tracking parameters, Stiddle may not be able track and attribute your ads accurately. Make sure to double check each UTM after setting up.
Building Your Own UTM String We recommend using the pre-made UTM strings listed above to ensure quick and proper setup, however we understand in some circumstances you'll need to add individual UTM parameters to one of your existing UTM strings. In this case, follow the instructions below to add Stiddle UTM parameters individually to your existing UTM string.
Stiddle only requires one of each parameters from "#1 Source Parameter" and "#4 Ad Parameter" listed below for Facebook Ads. "#2 Campaign Parameter" and "#3 Ad Set Parameter" are not absolutely required for the Stiddle Pixel to capture, however we recommend using one of each #1, #2, #3, and #4 listed below.
Your URL parameters should include one parameter option from each of the listed parameters below (#1, #2, #3, #4) within the UTM parameter string:
#1. Source Parameter
utm_source=facebook

OR

st_source=facebook

OR

source=facebook
#2. Campaign Parameter
utm_campaign={{campaign.id}}

OR

st_campaign={{campaign.id}}

OR

campaign={{campaign.id}}

OR

campaign_id={{campaign.id}}
#3. Ad Set Parameter
st_adset={{adset.id}}

OR

adset={{adset.id}}

OR

utm_content={{adset.id}}
#4. Ad Parameter
st_adid={{ad.id}}

OR

adid={{ad.id}}

OR

ad_id={{ad.id}}

OR

fbadid={{ad.id}}
Important Please also note, if you're using an existing UTM parameter that isn't listed above, and you are unable to manually update your UTM parameters, we most likely can add your existing parameter to our system ~ allowing the Stiddle Pixel to track without any manual updates to your existing UTM string within Facebook Ads.
Adding the UTM Parameters manually within Facebook
When using Facebook Ads Manager, every ad you create or modify includes a Tracking section. Within this section, you'll find a text field labeled "URL Parameters" where you can insert tracking parameters. For effective Pixel tracking, it's essential to include our recommended tracking parameters in this field for each ad you wish to track. To streamline the process, you also have the option to edit multiple ads simultaneously on Facebook, eliminating the need to perform this task individually.
Navigate to your Facebook Ads Manager account, either select an existing ad to edit or create an ad.
Scroll down to the “Tracking” section, and paste your copied UTM parameter in the “URL Parameters” field within the Facebook ad.
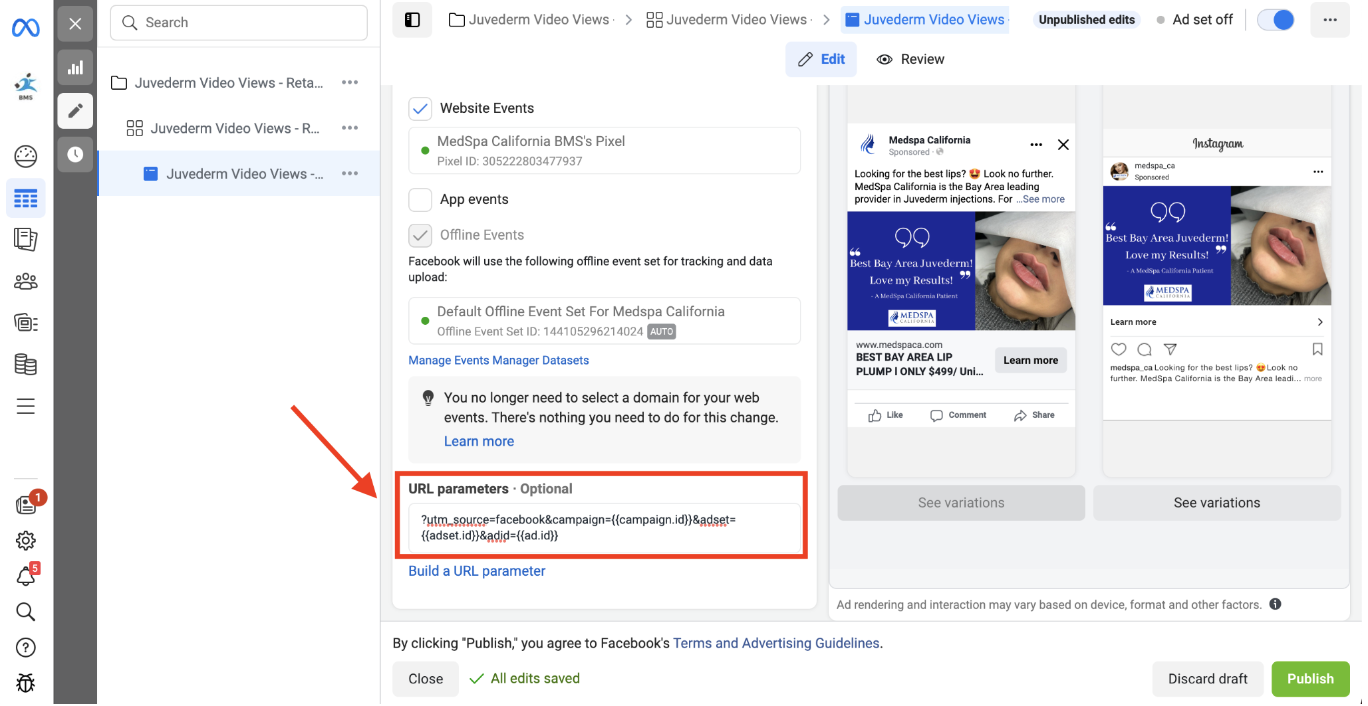
Simply select “Publish” in the bottom right corner. That’s it, you’re all set!
Important Please note that when updating the URL with your UTM parameter, your ad will go into “processing” status. When in this “processing” status, Facebook may stop spend on your ads - this can take up to one hour until your ads become live again.
In some rare cases, updating the ad with a UTM parameter may cause Facebook to reset the ad’s social proof and may cause it to go back into the “learning phase”.
Adding UTM Parameters to a Facebook Ad using the URL Builder:
Another way to add the UTM tracking parameters to your Facebook ads is using the URL parameter builder within your Facebook ad.
To add your UTM parameter using this method, navigate to the same “Tracking” section of your ad, then simply click the “Build a URL parameter” button below the manual entry field.

You’ll then be prompted to select a dynamic parameter for the following presets: campaign source, campaign medium, campaign name, and campaign content. DO NOT USE THESE PRESETS!
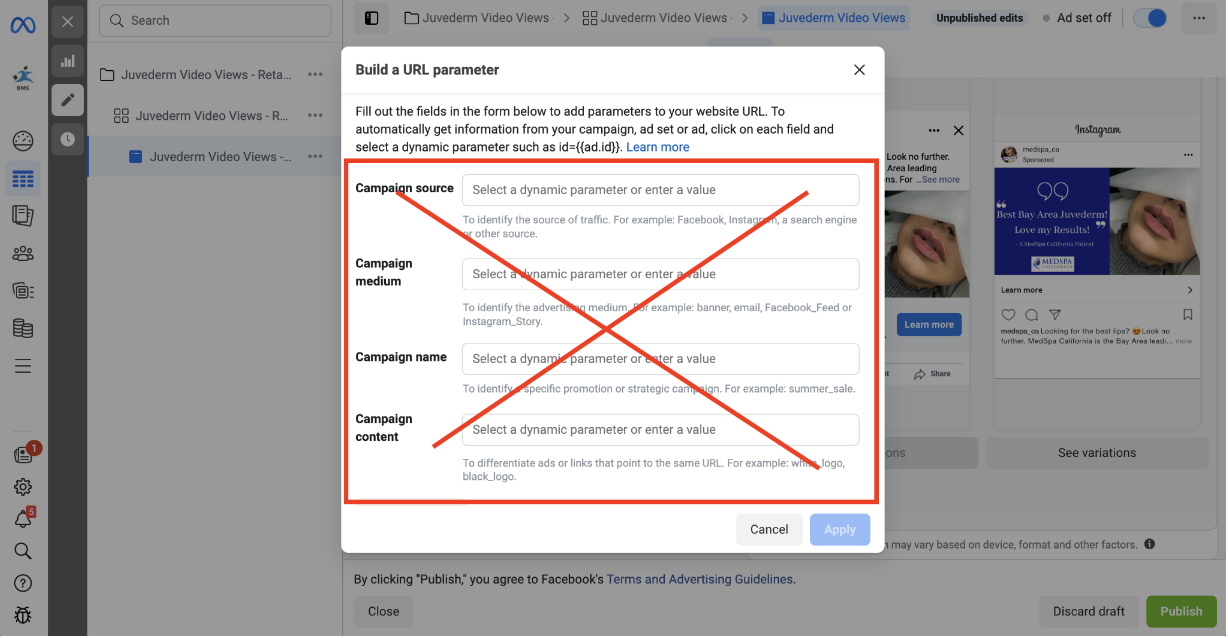
Instead scroll down to “Custom Parameters”, select “Add Parameter”, then paste the following parameter names and values.
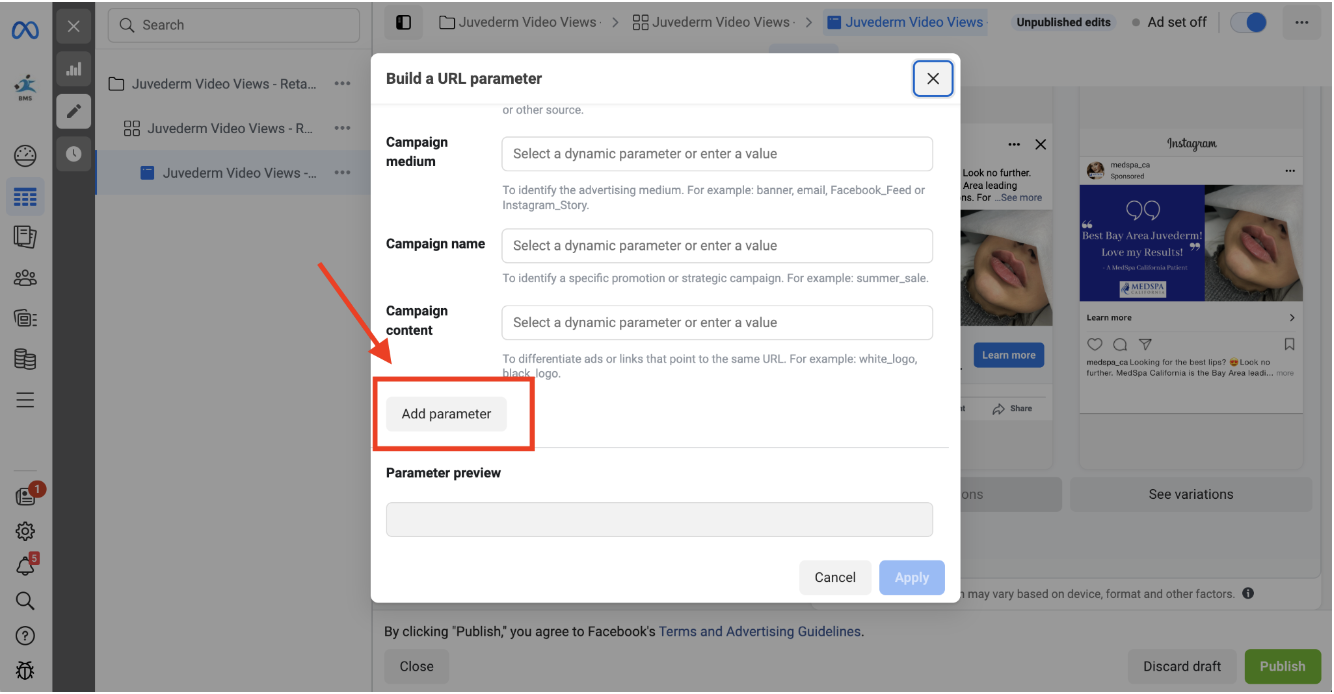
Be sure to create a new custom parameter for each of the following.
Parameter Name:
source Value: facebookParameter Name:
campaign Value: {{campaign.id}}Parameter Name:
adset Value: {{adset.id}}Parameter Name:
adid Value: {{ad.id}}
What’s the difference between using the manual UTM parameter (copy & paste) vs. the UTM Builder within Facebook?
There are no pros or cons to either UTM tracking parameter installation methods listed above - both work the same. However, do make sure to add these UTM tracking parameters to every active ad - if no UTM parameters are added, Stiddle will not be able to track and attribute properly.
Verifying that UTM parameters are setup correctly on my ads
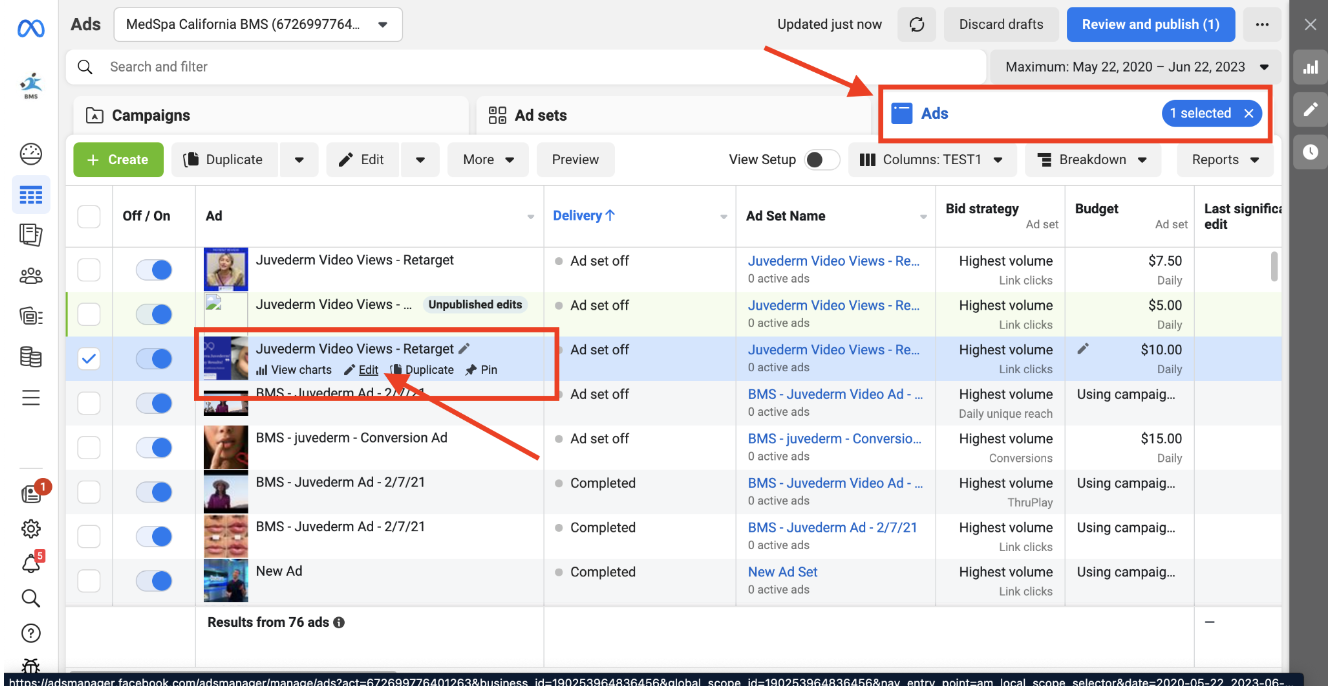
You can quickly verify that your UTM parameters are set up correctly on your ads using the Ads Manager.
Go to your Facebook Ads Manager, then navigate to the Ads tab.
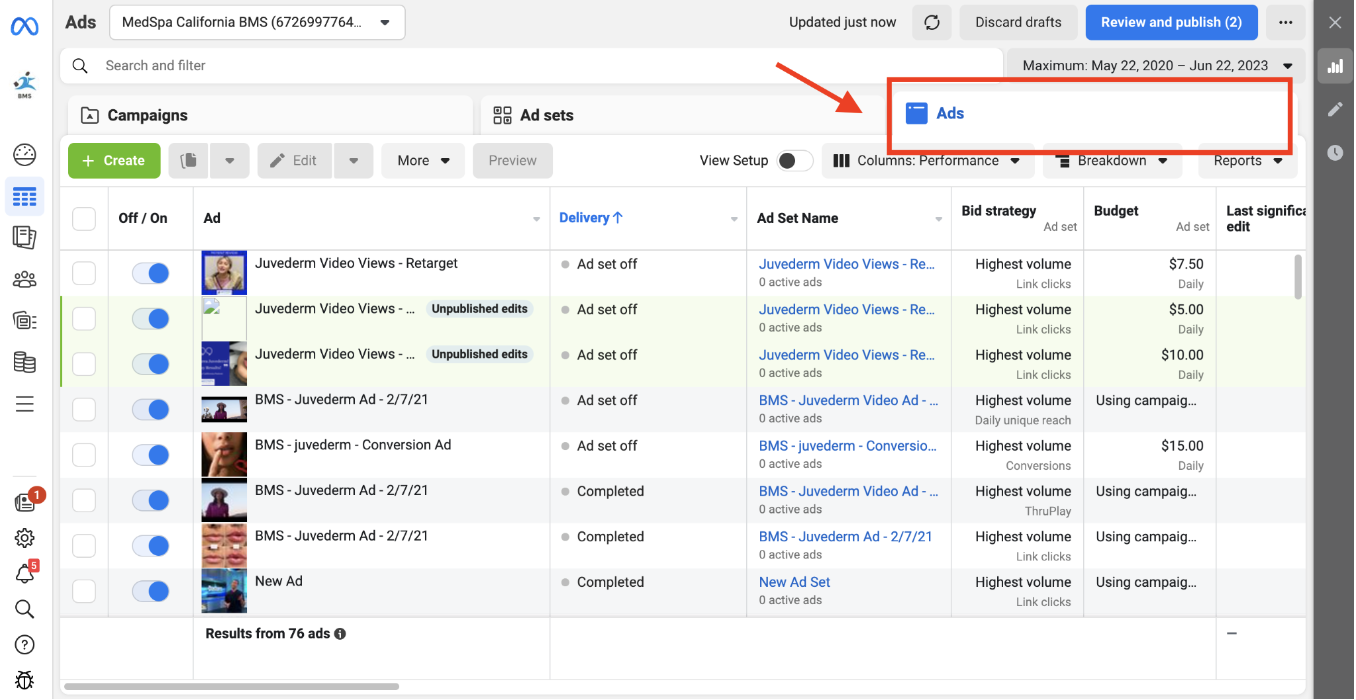
Simply select the “View Setup” toggle switch. You should now see a list of which ads have UTM parameters properly set up under the column “URL Parameters”. If an active ad doesn’t have a UTM parameter setup it will remain blank, if this is the case simply repeat the above process to add your UTM parameter to that ad.
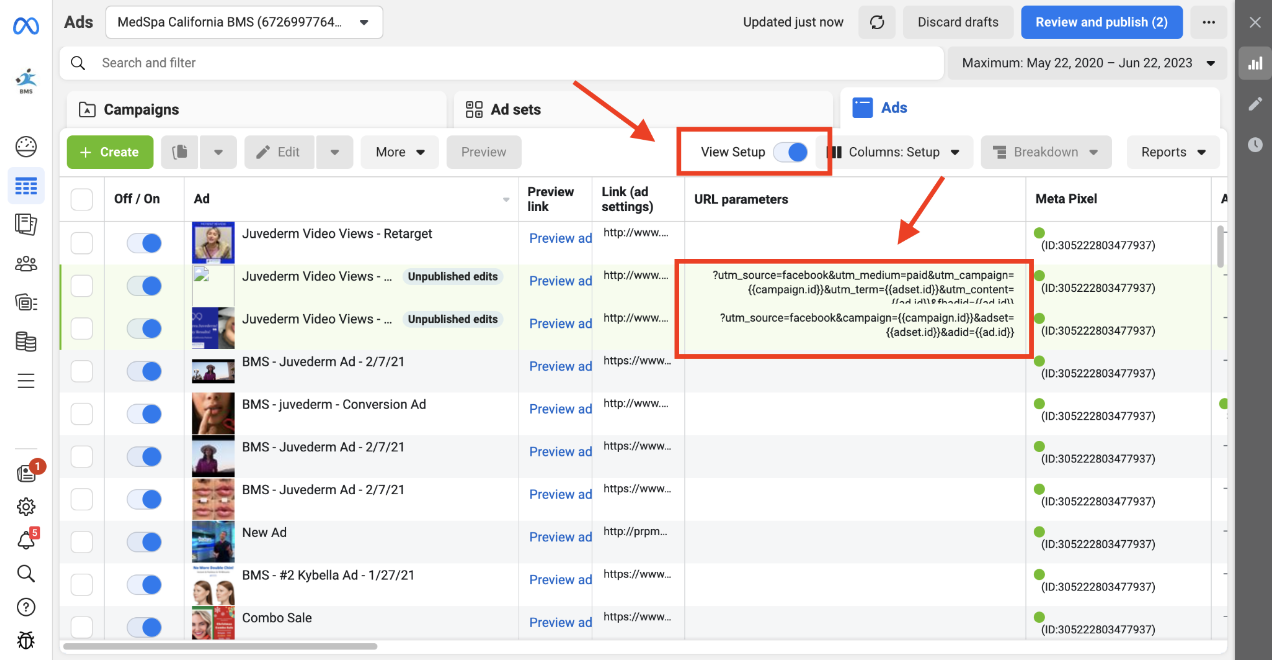
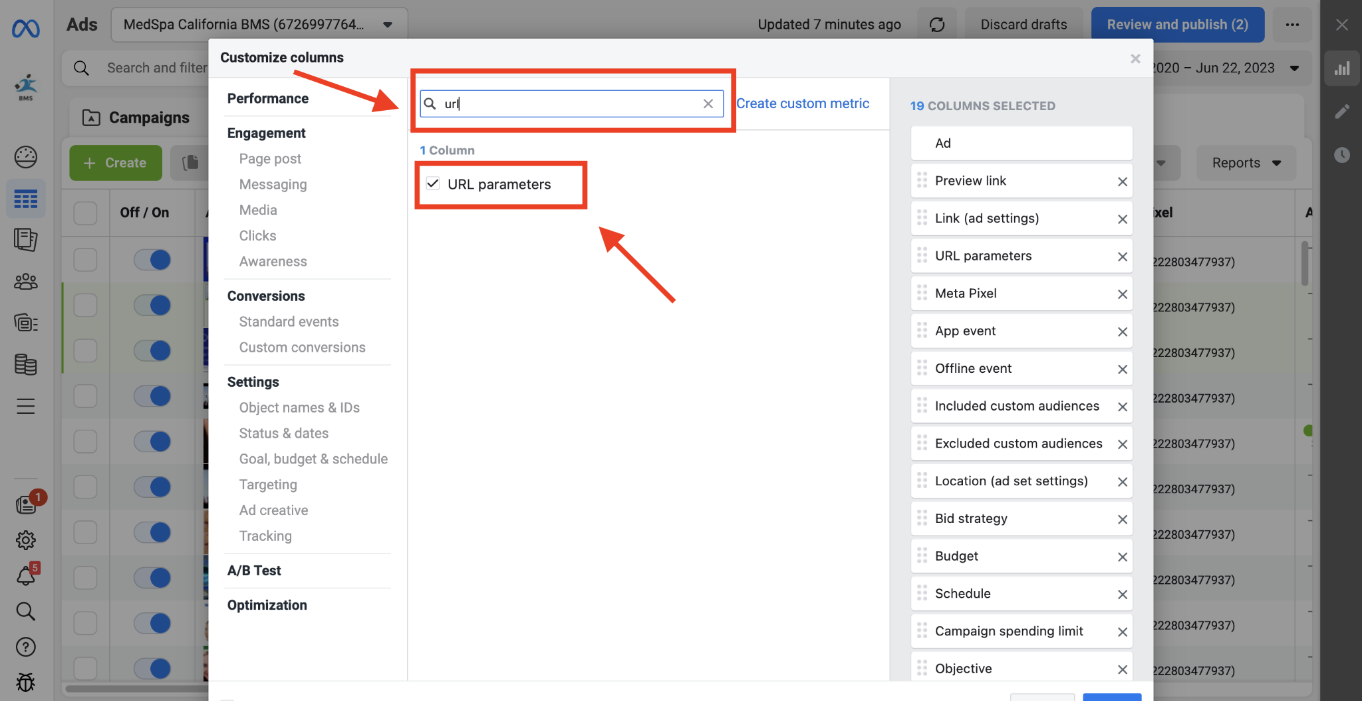
If you do not see the “URL parameter” column in your ads manager after selecting “View Setup”, select the “Columns: Setup” button, scroll down and select the “Customize Columns” button.
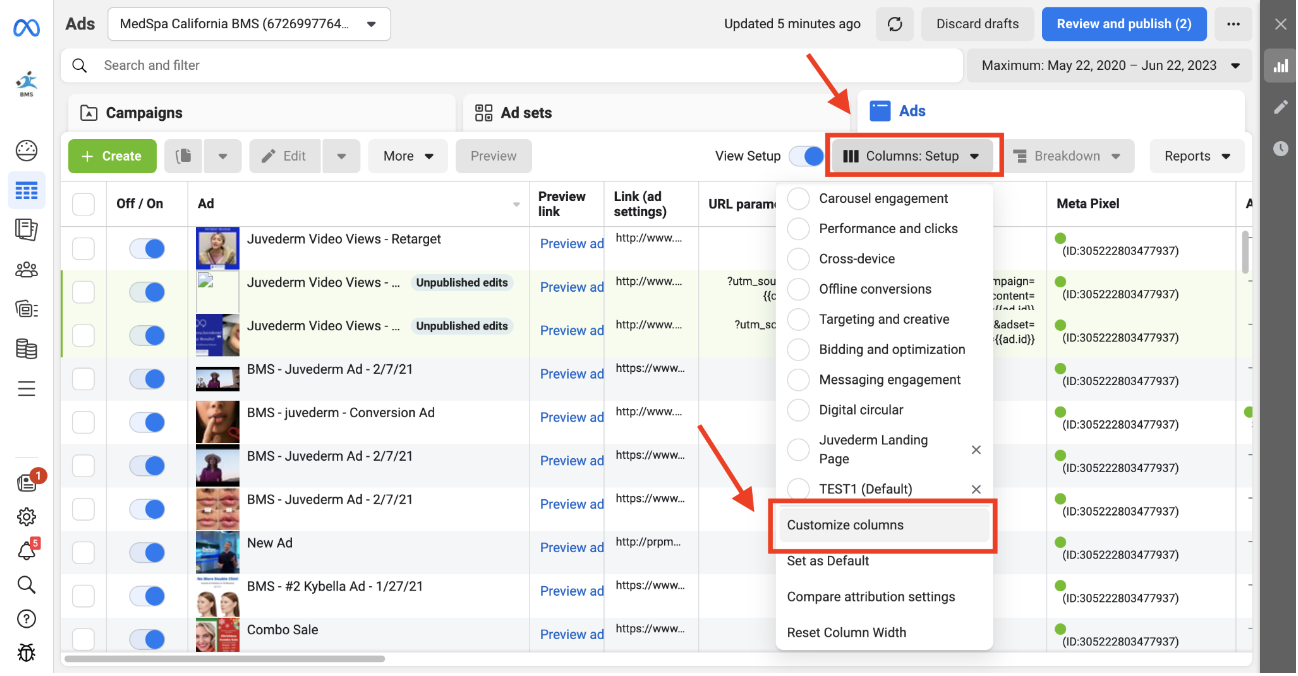
From here, you will be able to select the columns you want to see in your Ads Manager. Simply search for “URL Parameter”, select, and click the “Apply” button at the bottom of the window. You should now see all of your UTM parameters listed for each ad.
Setup UTM parameters for Google Ads
There are a few different ways to add UTM parameters to your Google ads, please follow the directions below for correct setup.
Setting up UTM parameters for Google Ads
Important Please note that to set up UTM Parameters within a Google Ads account, you will need to have user or admin privileges to the ad account. A manager account (MCC) is also acceptable as long as you have access to the ad account.
If you are not currently using any existing UTM parameters in your Google ads that you’d like to track using Stiddle, this is the easiest way to set up your UTM parameter tracking.
Login to your Stiddle account, select the workspace you’d like to start tracking, then navigate to your left hand menu and select “UTM Manager”.

Select “Google Ads” from the top menu - you should now see your UTM parameter displayed for Google Ads.
Simply copy the UTM parameter by clicking “Copy UTM”.

Recommended Stiddle UTMs For Google Ads
You can also copy the following UTM parameter string from below. We recommend using the first UTM parameter string with "st_". We've built our own version of "utm_" to prevent issues with existing UTM parameters you may already be using. Using "st_" ensures Stiddle is tracking every parameter string correctly, without interference.
{lpurl}?st_source=google&st_medium=paid&st_campaign={{campaignId}}&st_content={{adGroupId}}&st_term={{keyword}}&st_adid={{creative}}

OR

{lpurl}?utm_source=google&utm_medium=paid&utm_campaign={{campaignId}}&utm_content={{adGroupId}}&utm_term={{keyword}}&gadid={{creative}}
Google Tracking Templates - Creating your own parameter URL
Important Please note that if your ads do not contain ALL of the following tracking parameters, Stiddle may not be able track and attribute your ads accurately. Make sure to double check each UTM after setting up.
Building Your Own UTM String We recommend using the pre-made UTM strings listed above to ensure quick and proper setup, however we understand in some circumstances you'll need to add individual UTM parameters to one of your existing UTM strings. In this case, follow the instructions below to add Stiddle UTM parameters individually to your existing UTM string.
Your URL parameter tracking template should include one parameter option from each of the listed parameters below (#1, #2, #3, #4, #5, #6, #7) within the UTM parameter tracking template string in Google Ads:
#1
{lpurl}#2 Source Parameter
st_source=google

OR

utm_source=google

OR

source=google
#3 Medium Parameter
st_medium=paid

OR

utm_medium=paid

OR

medium=paid
#4 Campaign Parameter
st_campaign={{campaignId}}

OR

utm_campaign={{campaignId}}

OR

campaign={{campaignId}}
#5 Ad Group Parameter
utm_content={{adGroupId}}

OR

st_content={{adGroupId}}
#6 Keyword Parameter
st_term={{keyword}}

OR

utm_term={{keyword}}

OR

utm_keyword={{keyword}}

OR

keyword={{keyword}}
#7 Ad Parameter
st_adid={{creative}}

OR

gadid={{creative}}

OR

adid={{creative}}

OR

ad_id={{creative}}
Adding the Stiddle UTM parameters to an ad with existing UTM parameters (both Google Ads & Facebook Ads)
If you are already using UTM parameters in your ad’s Tracking Template, you can simply add the following parameters to the end of your existing UTM parameter URL.
To append new parameters to the end of your existing UTM parameter URL, simply add an “&” then add the new parameter.
Here’s an example:
Existing UTMs in place:
{lpurl}?utm_source=google&utm_keyword=advertiserStiddle UTM Tracking:
{lpurl}?utm_source=google&utm_medium=paid&utm_campaign={{campaignId}}&utm_content={{adGroupId}}&utm_term={{keyword}}&gadid={{creative}}Combined:
{lpurl}?utm_source=google&utm_keyword=advertiser&utm_medium=paid&utm_campaign={{campaignId}}&utm_content={{adGroupId}}&utm_term={{keyword}}&gadid={{creative}}Important Please note that you should not use the name parameter twice in the same URL. For example if you are combining the Stiddle UTM parameters to an existing UTM parameter URL and they both have the same parameter such as utm_campaign=myfavoritecampaign and the Stiddle UTM parameter, utm_campaign={{campaignId}} Stiddle will not be able to identify which parameter is a priority. In this case, please rename your existing parameter or simply add a “1” to the end of your existing (non-stiddle) parameter name.
We recommend using the UTM parameter strings listed above that contain "st_" to avoid issues like this. We've built our own version of "utm_" to prevent issues with existing UTM parameters you may already be using. Using "st_" ensures Stiddle is tracking every parameter string correctly, without interference.
Where to manually add the UTM Parameters in Google
When setting up your UTM parameters within Google Ads, make sure to follow ALL of the following steps. If a parameter is missing or a UTM is in the wrong place, Stiddle may not track and attribute your ads accurately.
There are three places to add the Stiddle UTM Parameters within your Google Ads account.
Important (NEW GOOGLE ADS UI) If your Google account looks different than the instructions outlined below, please watch this video. Otherwise, stick to the instructions below.
Step 1: Adding UTM Parameters to Account Settings
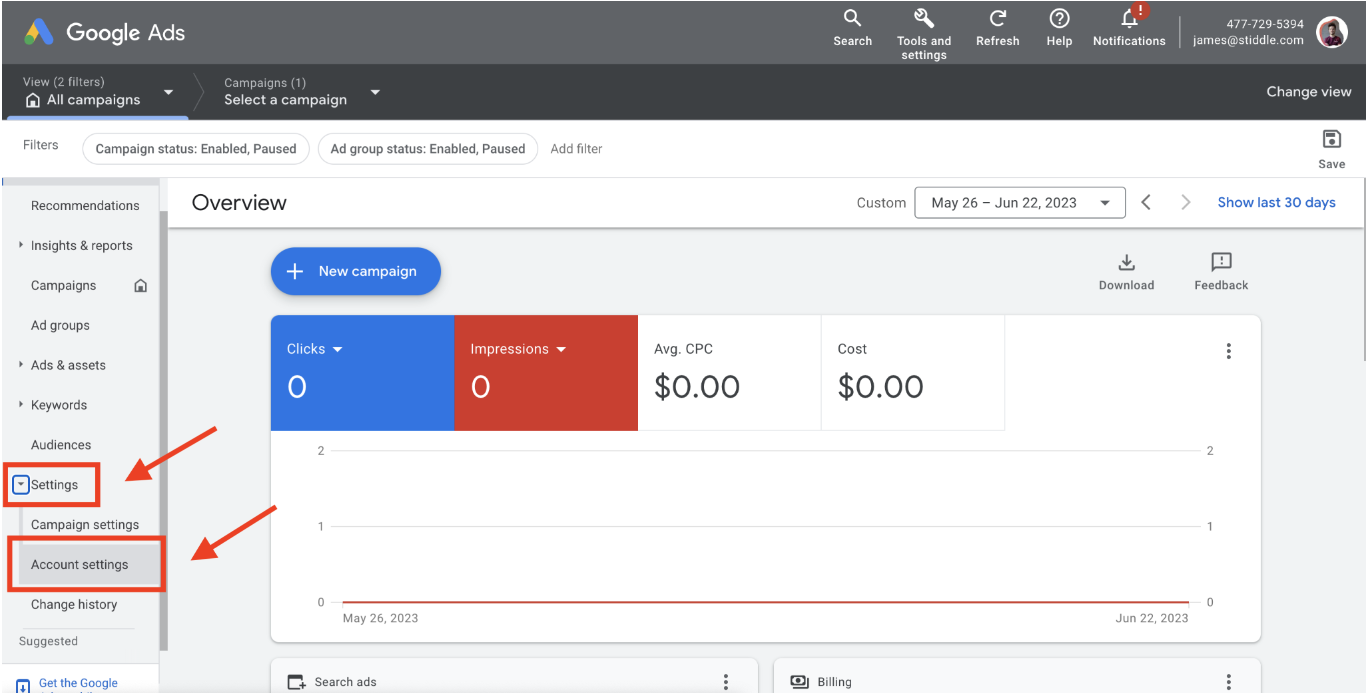
Go to your Google Ads account, then navigate to the left hand menu and select “Account Settings”. This is found under the “Settings” menu tab.
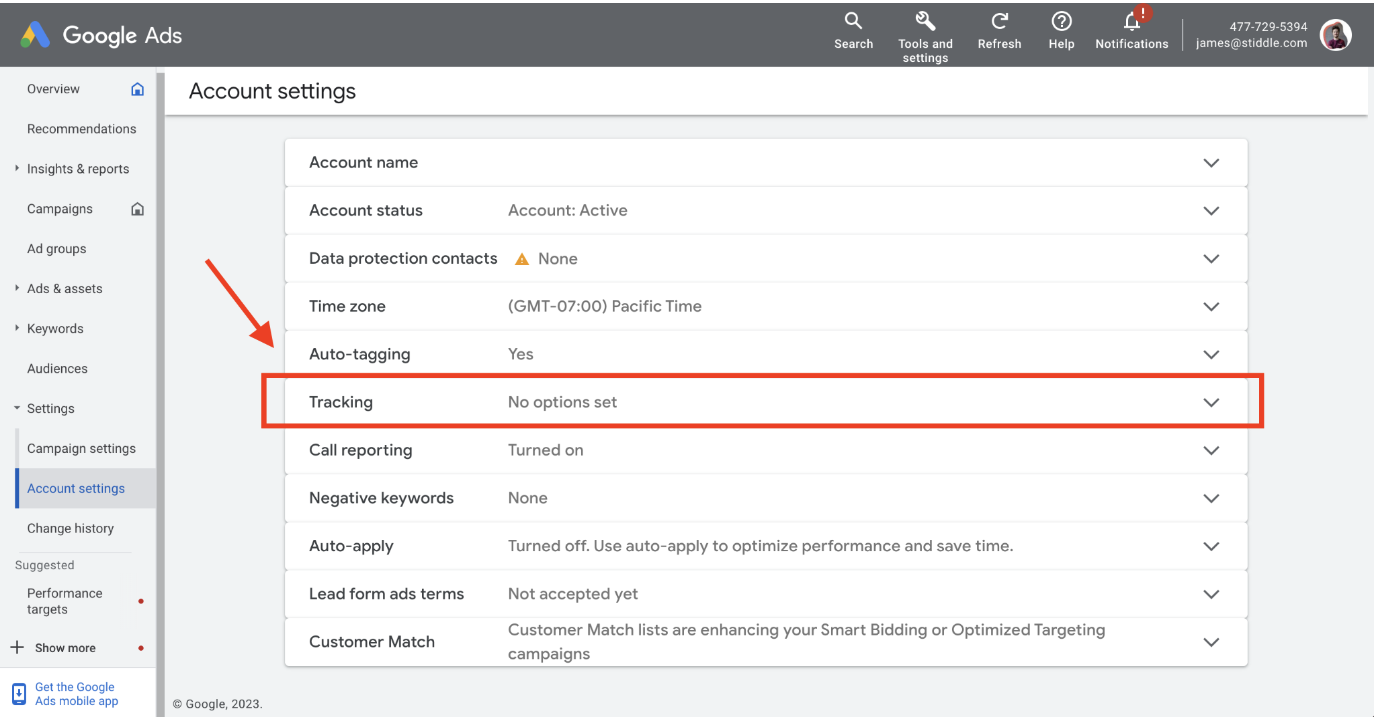
Navigate to the “Tracking” section, click to expand.
Paste the Stiddle Google Ads UTM parameter. This is found above (and below) or copied from the Stiddle UTM manager page within your Stiddle workspace. Select save.
You can also copy from here:
{lpurl}?st_source=google&st_medium=paid&st_campaign={{campaignId}}&st_content={{adGroupId}}&st_term={{keyword}}&st_adid={{creative}}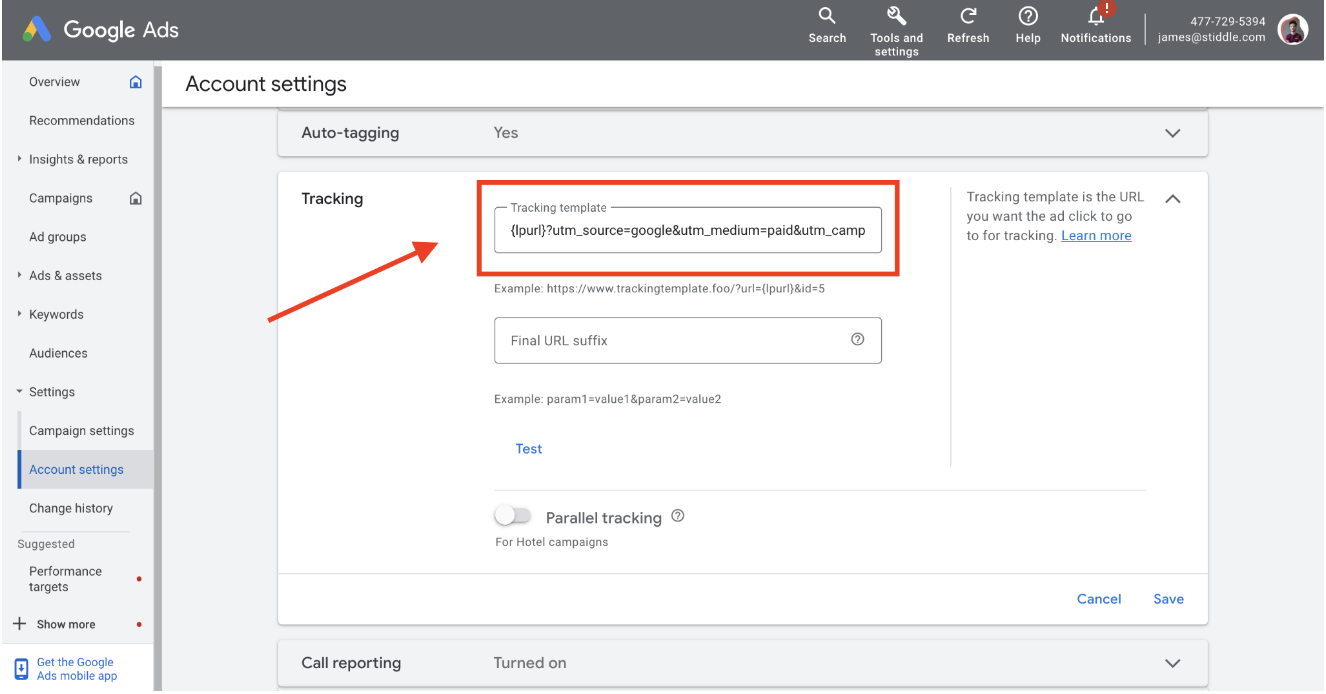
You’re all setup for your Google Account. Now you’ll need to add the Stiddle UTM parameters to your Campaign Settings. Proceed to step 3, “Campaign Settings”.
Step 2: Adding UTM Parameters to Campaign Settings
Navigate to the left hand menu and select “Campaign Settings”. This is found under the “Settings” menu tab.
Next, select (using the checkbox selector) all campaigns (top checkbox) or select the specific campaigns you want Stiddle to track.
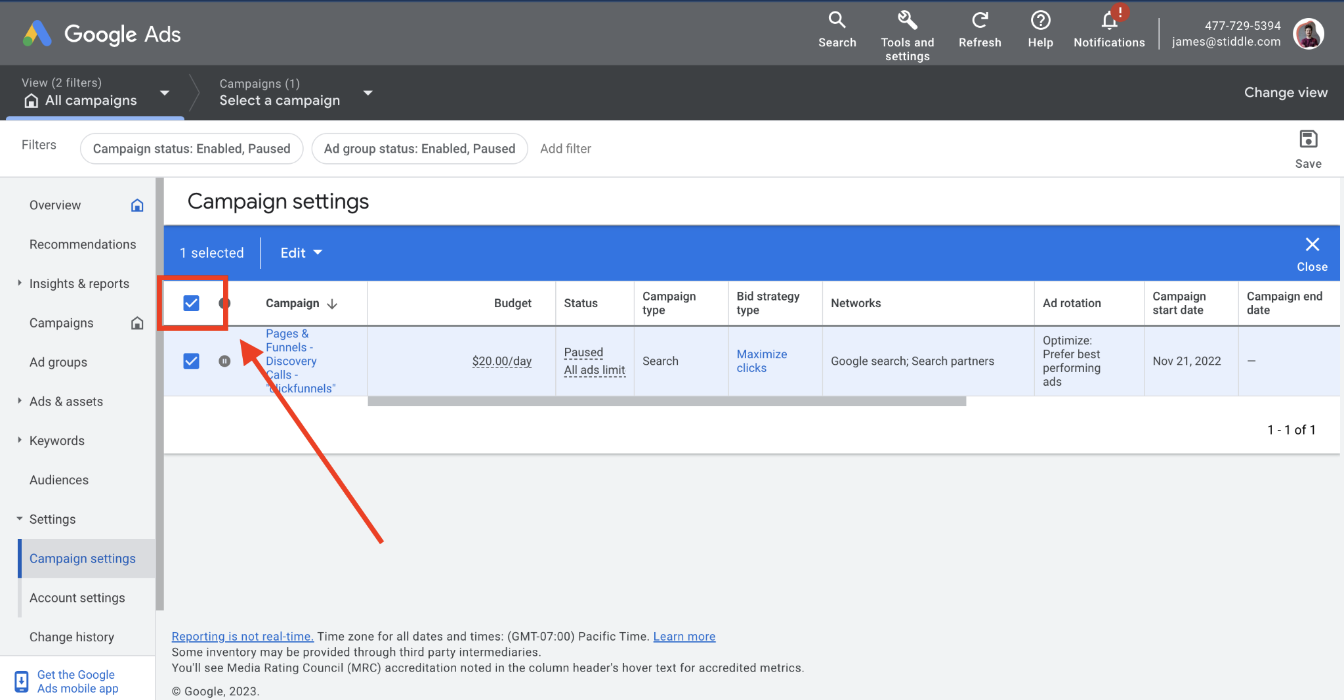
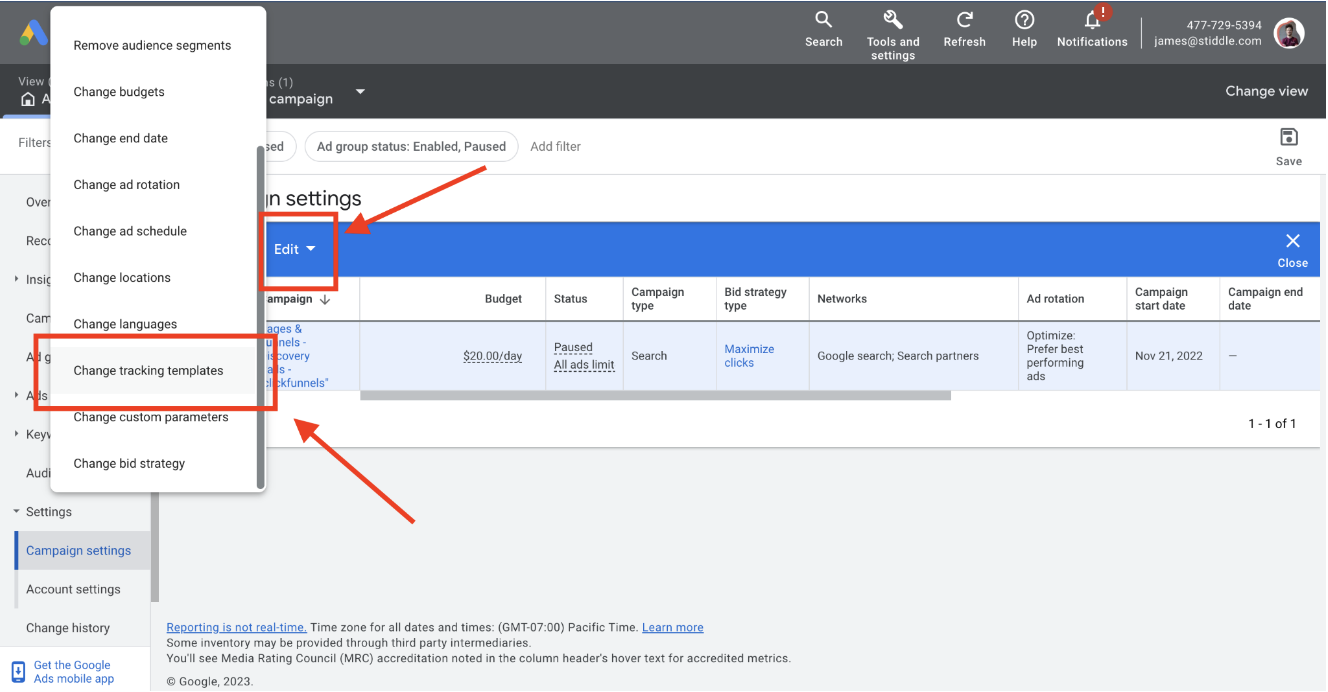
Select the “Edit” dropdown, then scroll down and select “Change tracking templates”.
Paste the Stiddle Google Ads UTM parameter. This is found above (and below) or copied from the Stiddle UTM manager page within your Stiddle workspace. Select save.
You can also copy from here:
{lpurl}?st_source=google&st_medium=paid&st_campaign={{campaignId}}&st_content={{adGroupId}}&st_term={{keyword}}&st_adid={{creative}}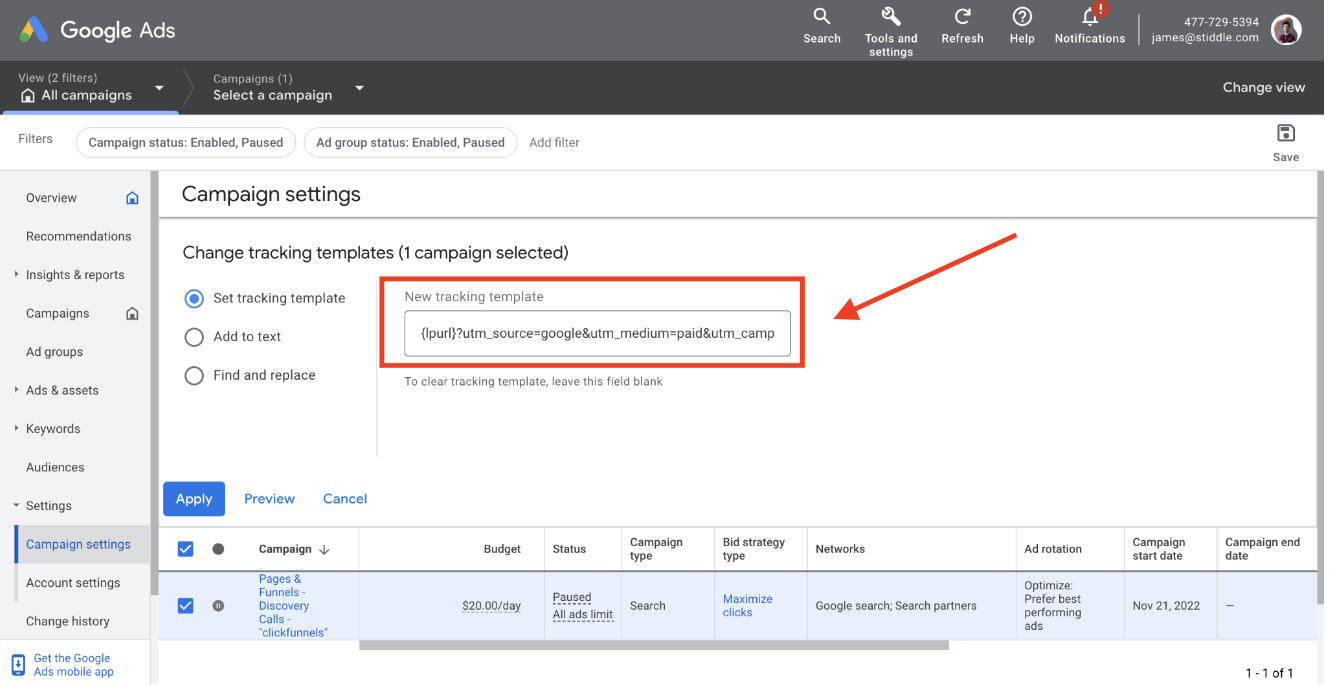
Step 3: Adding UTM Parameters to AdGroups
Navigate to the left hand menu and select “AdGroups”.
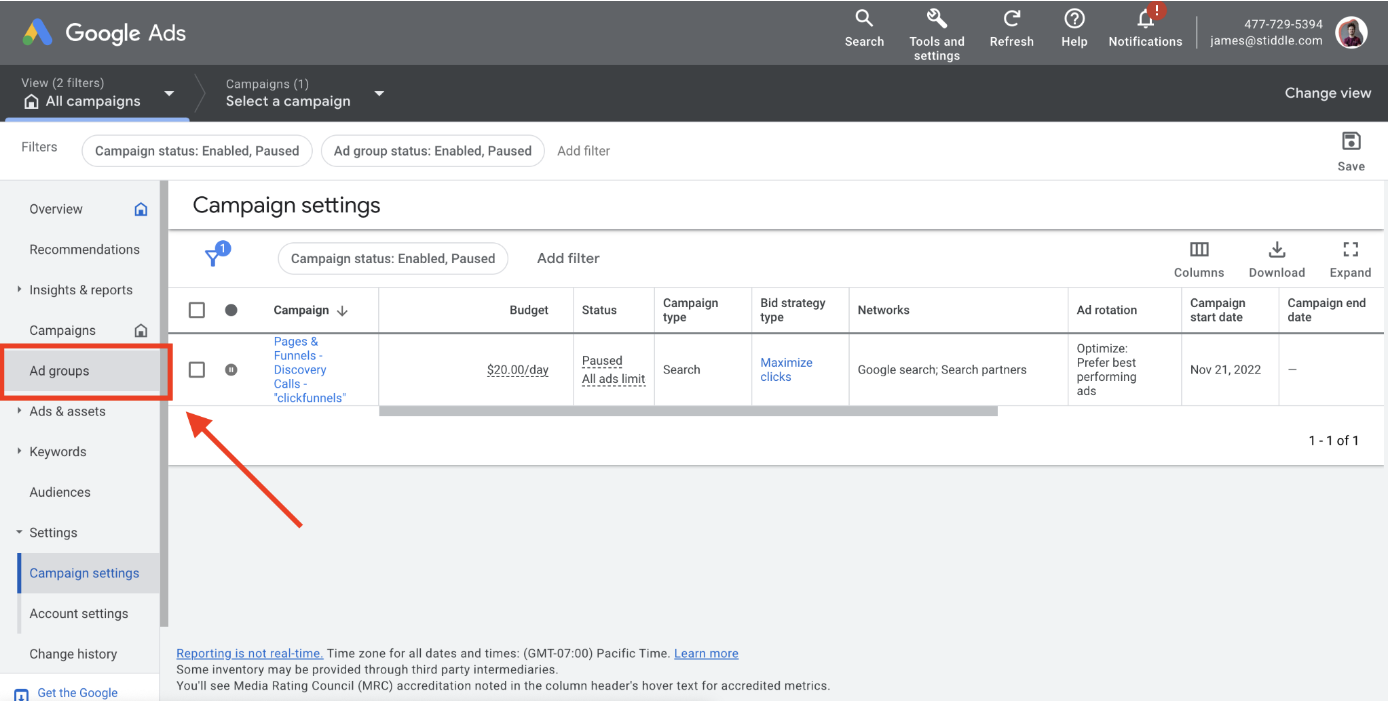
Next, select (using the checkbox selector) all ad groups (top checkbox) or select the specific ad groups you want Stiddle to track.
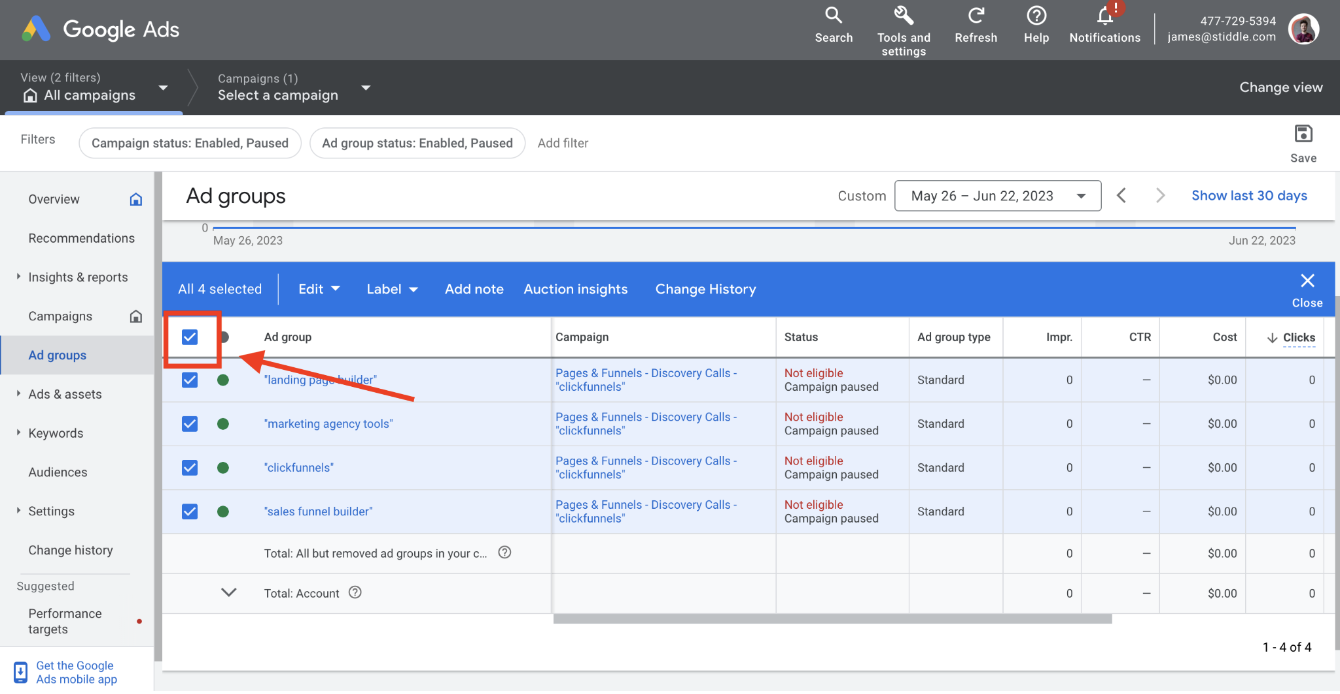
Select the “Edit” dropdown, then scroll down and select “Change tracking templates”.
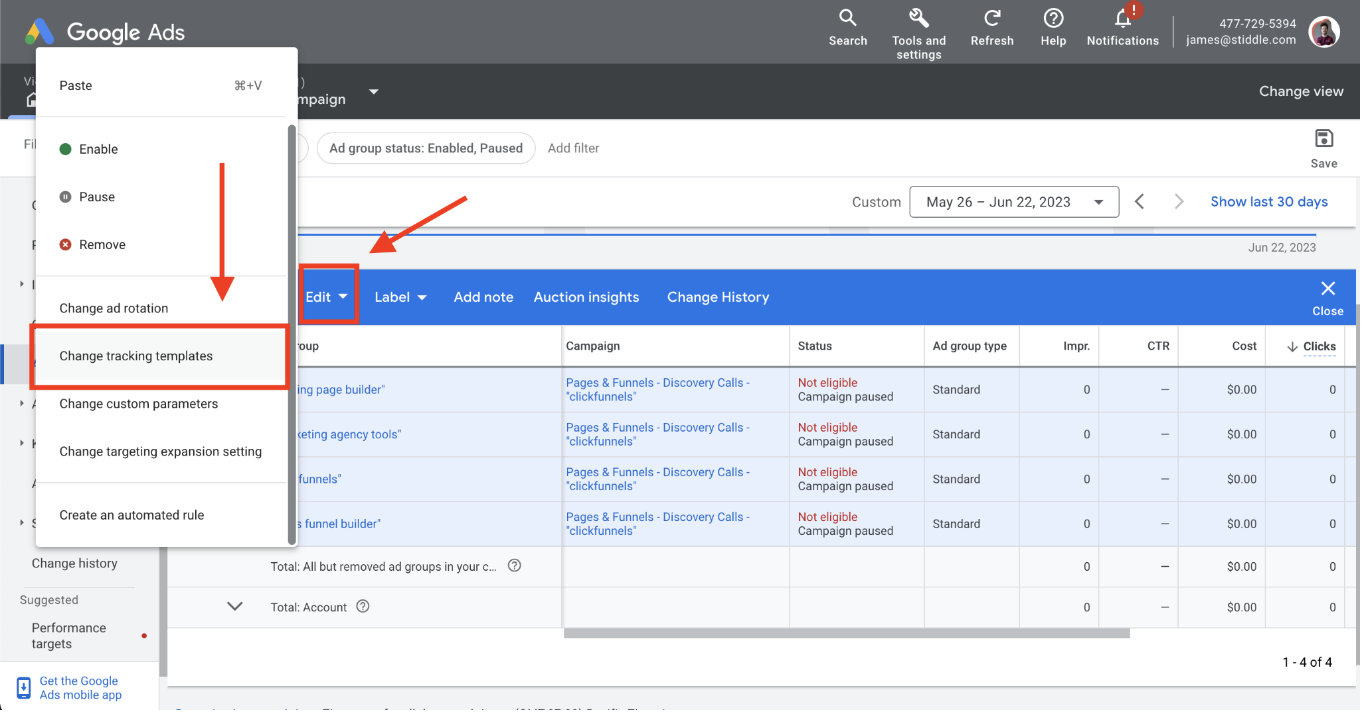
Paste the Stiddle Google Ads UTM parameter. This is found above (and below) or copied from the Stiddle UTM manager page within your Stiddle workspace. Select save.
You can also copy from here:
{lpurl}?st_source=google&st_medium=paid&st_campaign={{campaignId}}&st_content={{adGroupId}}&st_term={{keyword}}&st_adid={{creative}}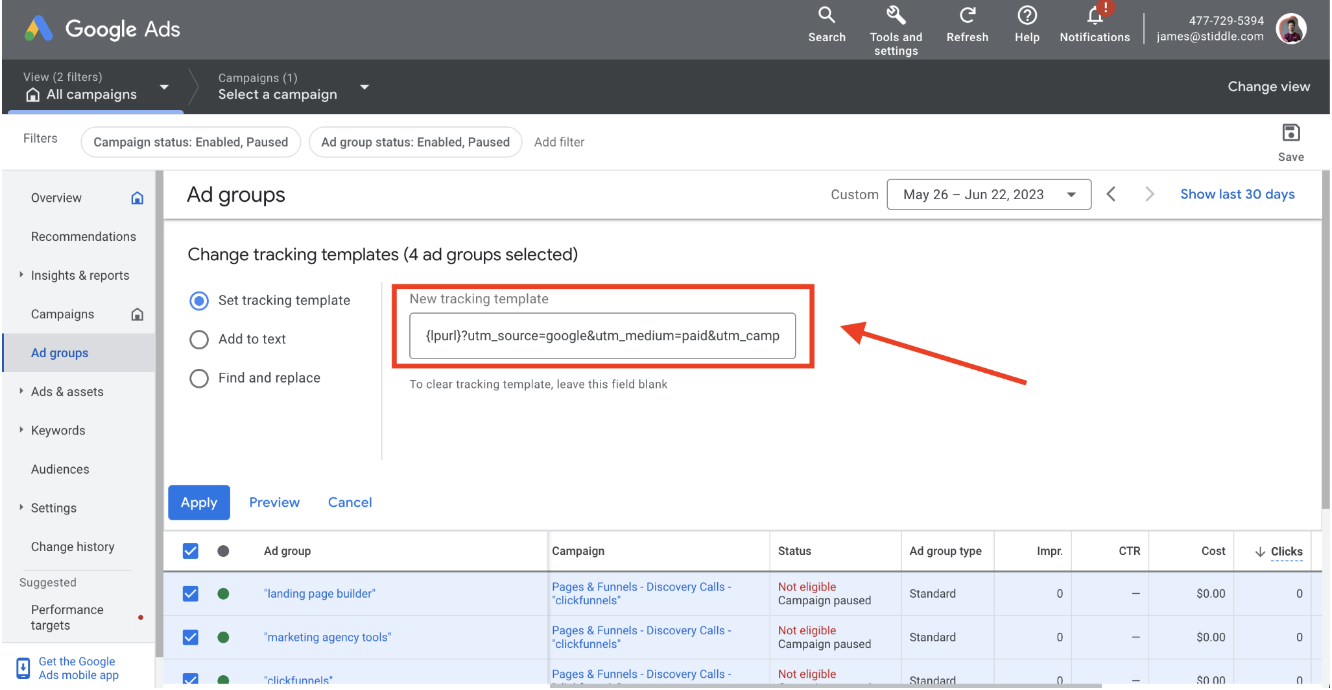
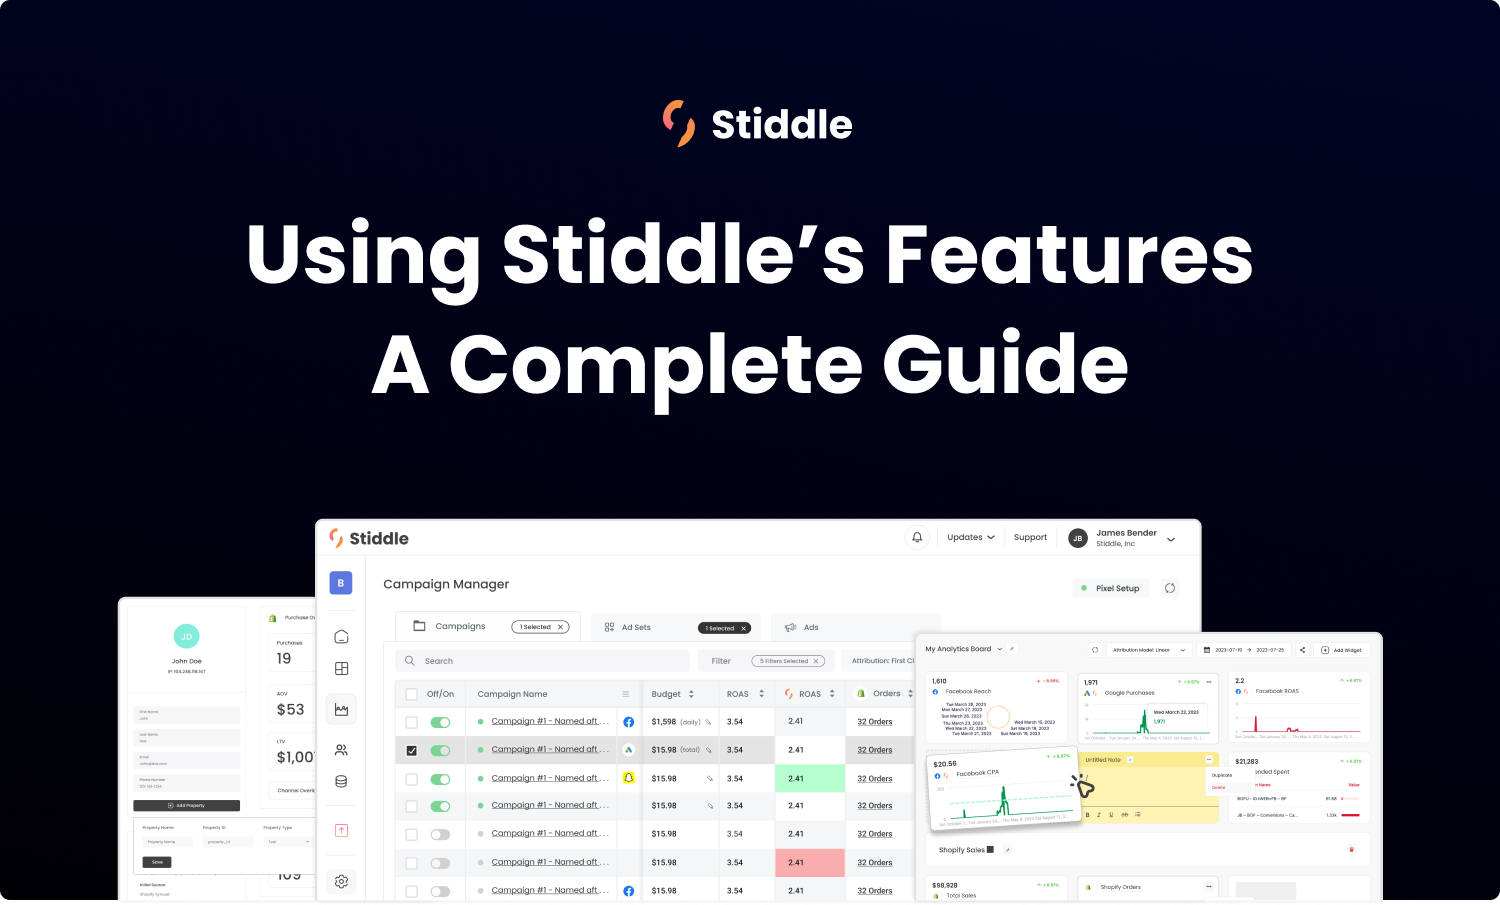
A Complete Guide to Exploring Stiddle's Features
Follow the guide below to learn about every feature Stiddle has to offer and how to use them effectively.
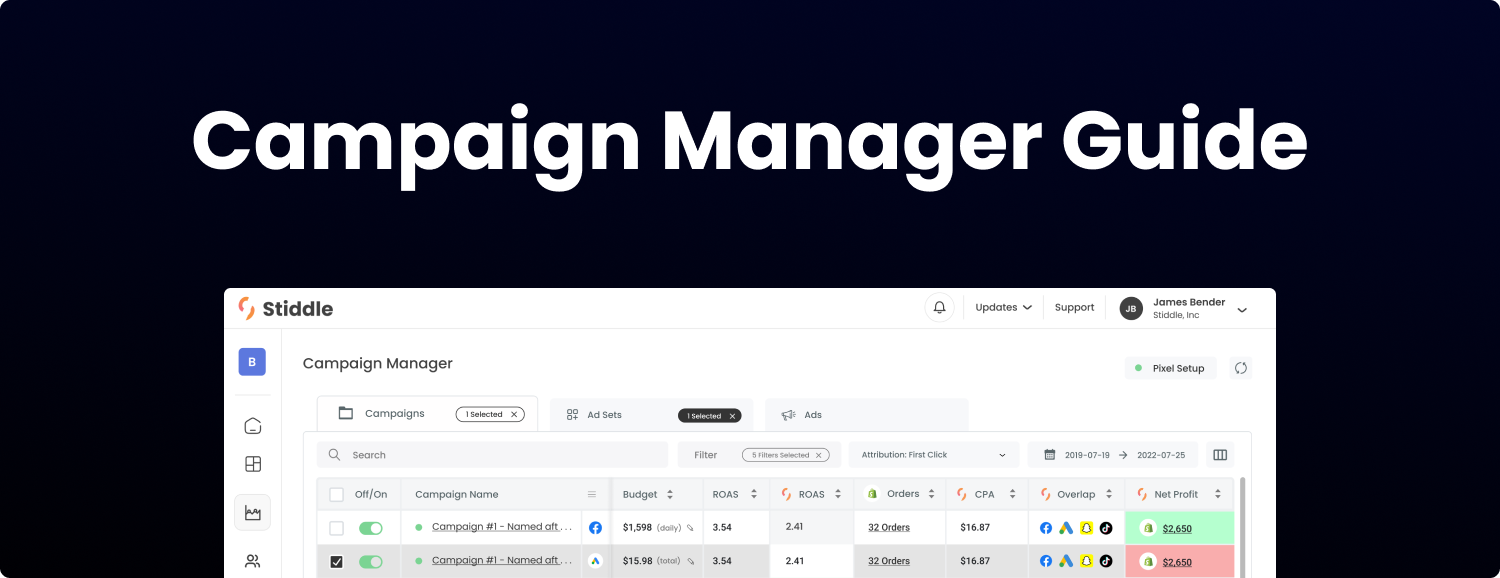
Everything About Campaign Manager
Once you’ve connected your ad channels (E.g. Facebook Ads & Google Ads), setup your Stiddle Pixel with Shopify, and setup you UTM parameters, you’ll be ready to start using the campaign manager.
Let's Get Started
Navigate to the left menu and select “Campaign Manager”.
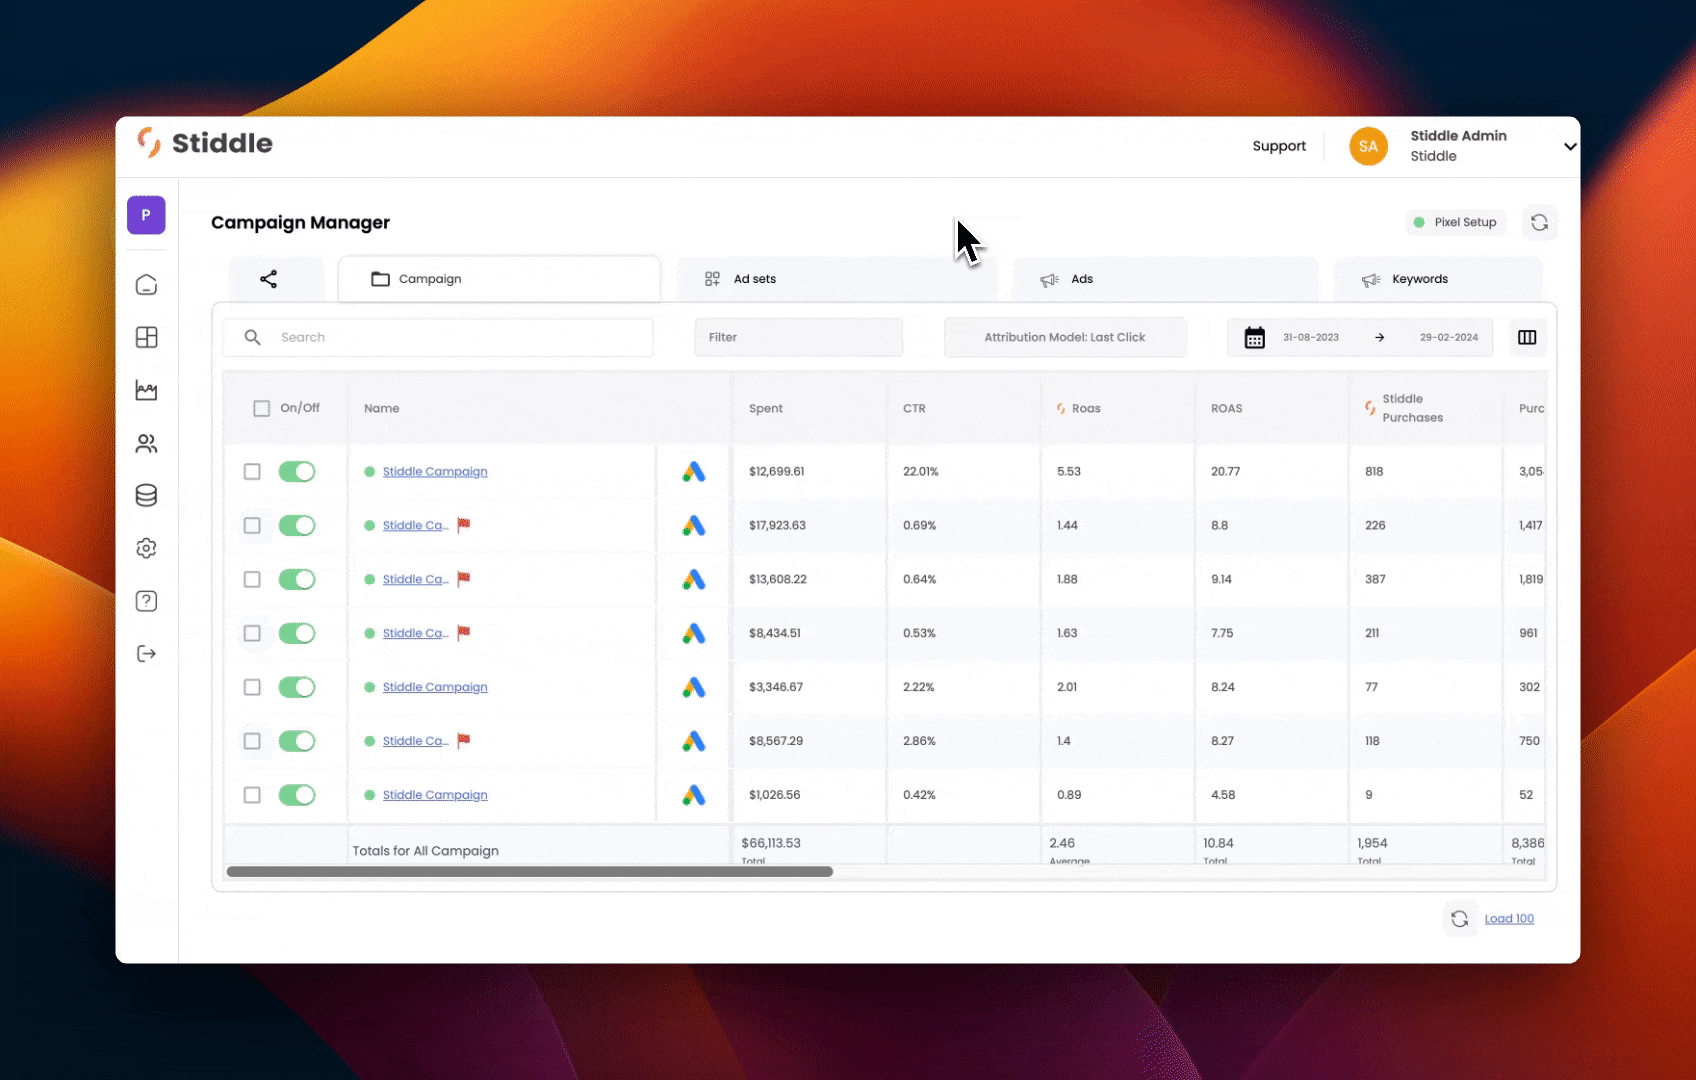
Once in the campaign manager, you’ll see an overview of all the ad channels you have connected, listed by the ad account names under the “Channel Sources” tab.

Important Please note that the ad accounts shown in the campaign manager, under the tab called “Channel Sources”, are the accounts enabled for the workspace within the connector settings. Only one ad account can be connected to each workspace. You can create additional workspaces to connect additional ad accounts.
Under channel sources you’ll see a default overview of all your ad accounts. Once you select one of your channel sources, you’ll be able to view the campaign details and configure your table view.
By selecting the “Orders” metric within the columns, you’ll be able to see a list of every customer that has purchased a product from that channel.


Select a Channel Source to dive deeper into the Campaign, Ad Set, and Ads performance.

By default, you’ll see a list of metrics on the top row of the campaign manager followed by the values for each column.

Columns can be customized according to the metrics that are most important to you. To select the metrics you want to view, simply select the “Metric Configurator” - located in the top right hand corner of the campaign manager.

In the “Metric Configurator”, you’ll see two options to select from - “Attributed” and “Original”.
What are attributed metrics? Attributed metrics is the accurate data tracked by the Stiddle Pixel. These metrics are attributed and the most accurately reported.
What are original metrics? Original metrics is the reported data by your ad channels, like Facebook Ads and Google Ads. This data is unreliable and not accurate. We recommend using this data to compare between Stiddle’s attributed metrics.

Comparing New Accurate Data to Original Data
Easily identify which campaigns, ad sets, and ads are performing well and cut losses on under performers. See a side by side comparison of both your platform original reported metrics and the accurate Stiddle attributed metrics.
As you can see below, Stiddle has reported 13 purchases, when compared to the original Facebook reported 6. Now that we know this, we can scale a campaign we would’ve otherwise stopped - thinking it was a loss.

Repositioning Table Columns
Easily change the position of columns by simply dragging and dropping each column to its new position.
Date Comparisons & Stiddle Max Date
Change the date view of your campaigns, ad sets, and ads by simply selecting the date selector button.
Important If you do not see any data for your campaigns, it is most likely that the date is not set to a date you have data for. To solve this, simply select “Maximum” to see all of your historical data.

To compare dates, select the “Compare” toggle switch in the date selector, then select the first period and last period dates to compare.

What is the Stiddle Max date option? The Stiddle Max date option is very important to understand! To view the maximum date range from your attributed metrics reported by Stiddle, you'll need to select the Stiddle Max date option. The standard Maximum option won't show any results for Stiddle attributed metrics.
Remember, the Stiddle Max option is showing data by selecting from the start date that the Stiddle Pixel begun tracking your ads. You can find this start date in the campaign table, the metric is called "Start Date". Please note that the start date may be different for each ad channel connected.
Loading Results In Campaign Manager Please note that the campaign manager table loads 30 campaigns/ad sets/ads at a time by default. Stiddle will automatically load more results as you scroll down the table, however if you need to load more than 30 at a time, you can select the "Load 100" button at the bottom of the campaign manager table.
Selecting Attribution Models
Stiddle offers several attribution models for analysis. Selecting between models allows you to see how credit is distributed amongst campaigns for purchases. Selecting between different attribution models will effect the reported attributed metrics in your campaign manager, such as ROAS and Orders. To learn more about Stiddle attribution models, visit our help docs article.
Stiddle currently offers the following attribution models:
- First Click ~ First Click Attribution gives full credit to the first ad click tracked in the customer's profile journey.
- Last Click ~ Last Click Attribution gives full credit to the last adclick tracked in the customer's profile journey.
- Linear (Multi-touch) ~ Linear assigns equal conversion value credit split evenly across every paid ad channel that Stiddle tracked in the customer's profile journey before a purchase was made.

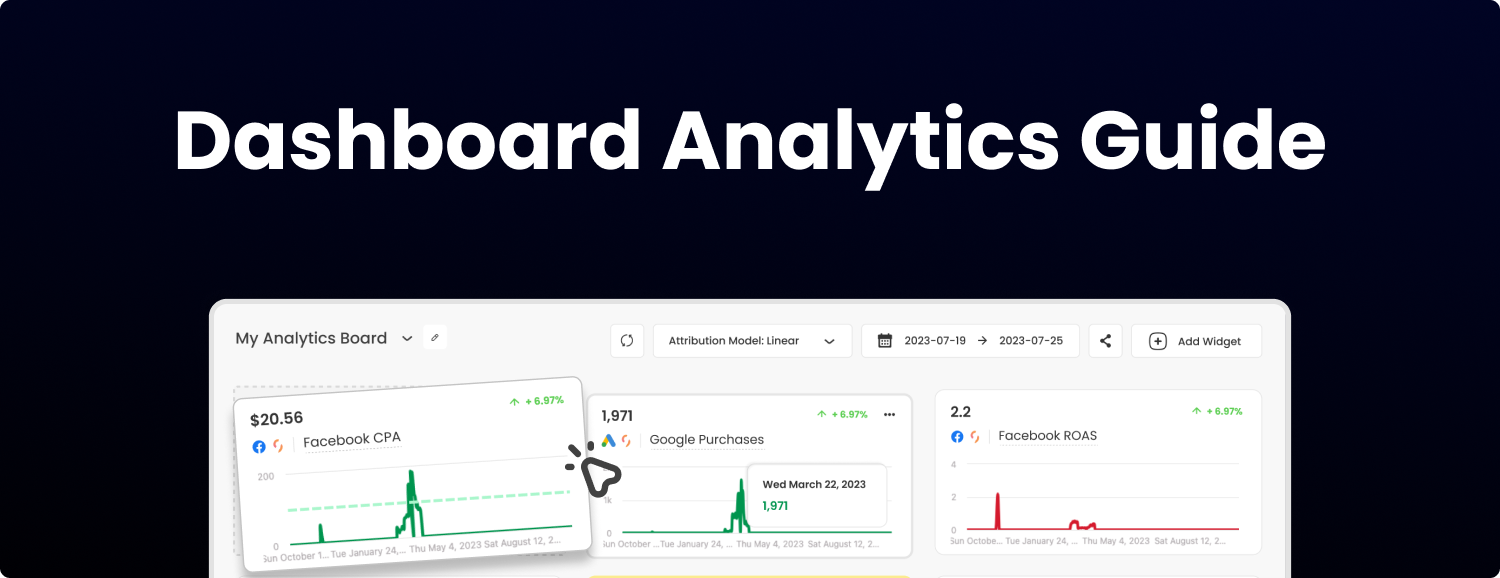
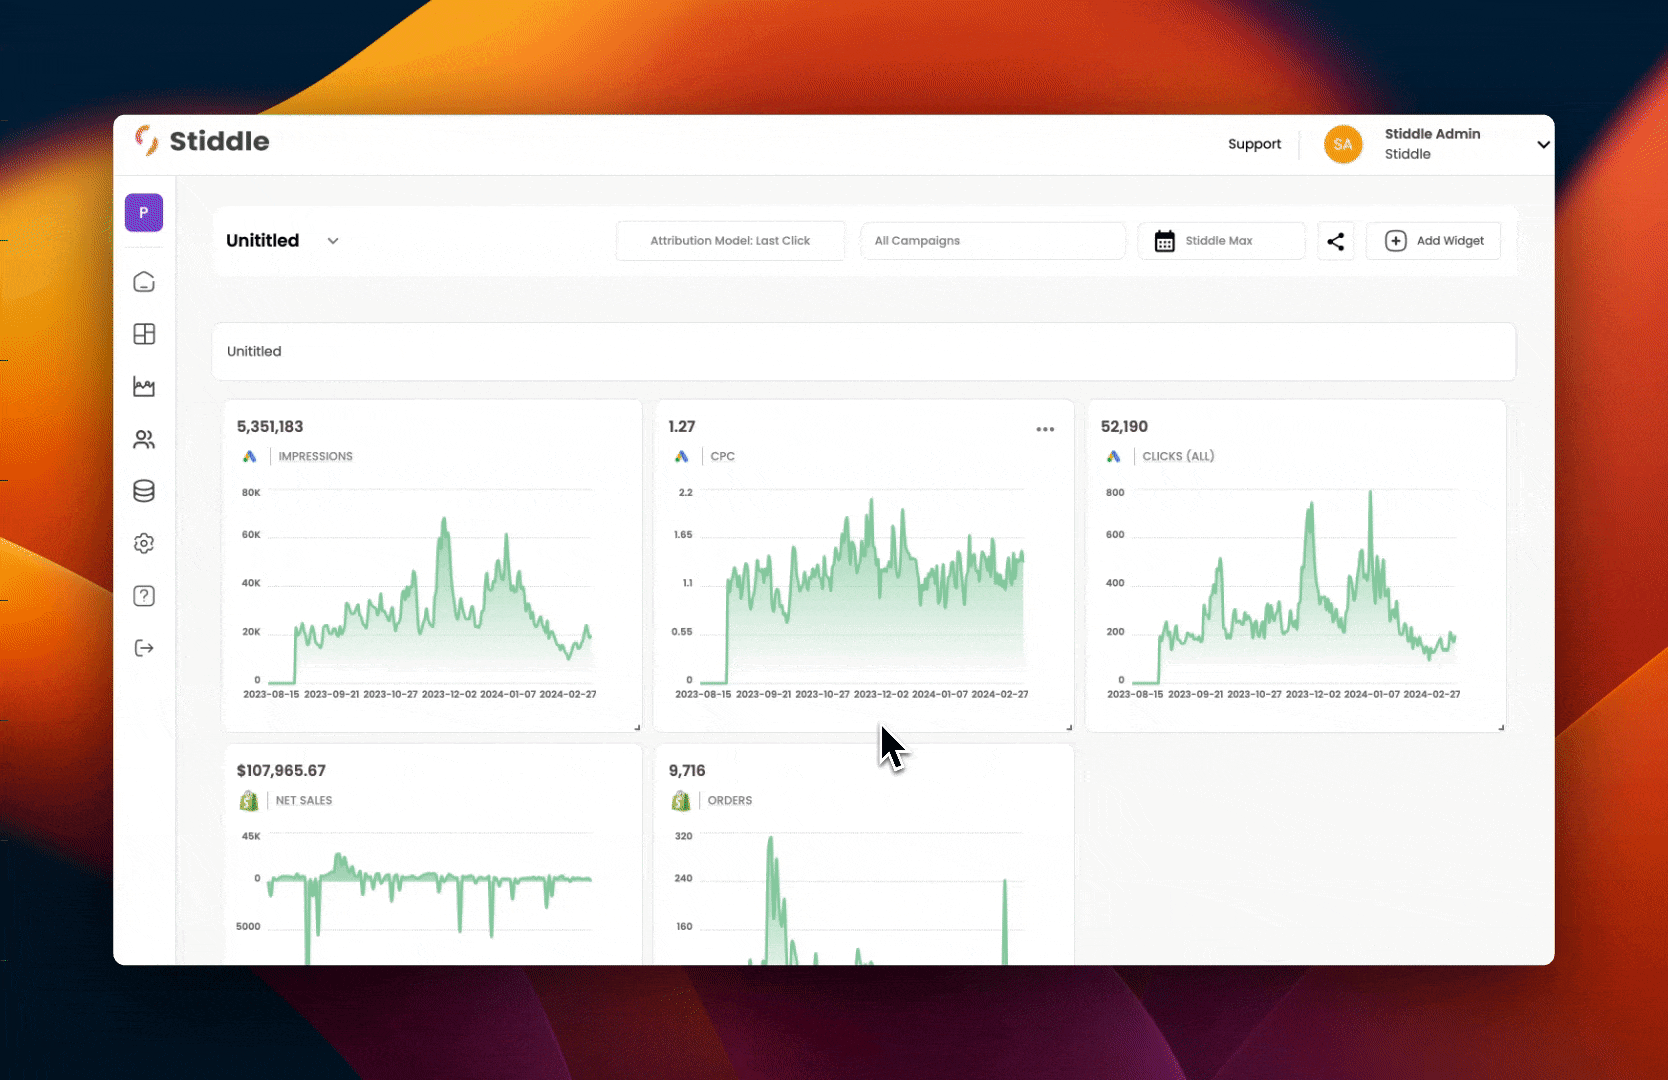
Creating a New Analytics Dashboard
Once you’ve connected your integrations, you can start using Dashboard Analytics.
There are two options to create a new dashboard. You can create one from scratch or by selecting from our pre-built templates. Follow the guide below.
Creating a new dashboard using a template
Navigate to the “All Dashboards” page located on the left hand menu.

Select the “New Board” button located at the top right of the page, then select the “Find Template” button.

Browse from a catalog of dashboard reports, these are pre-build dashboards that give you a great starting point to expand and configure.
Select the dashboard template you want to configure.
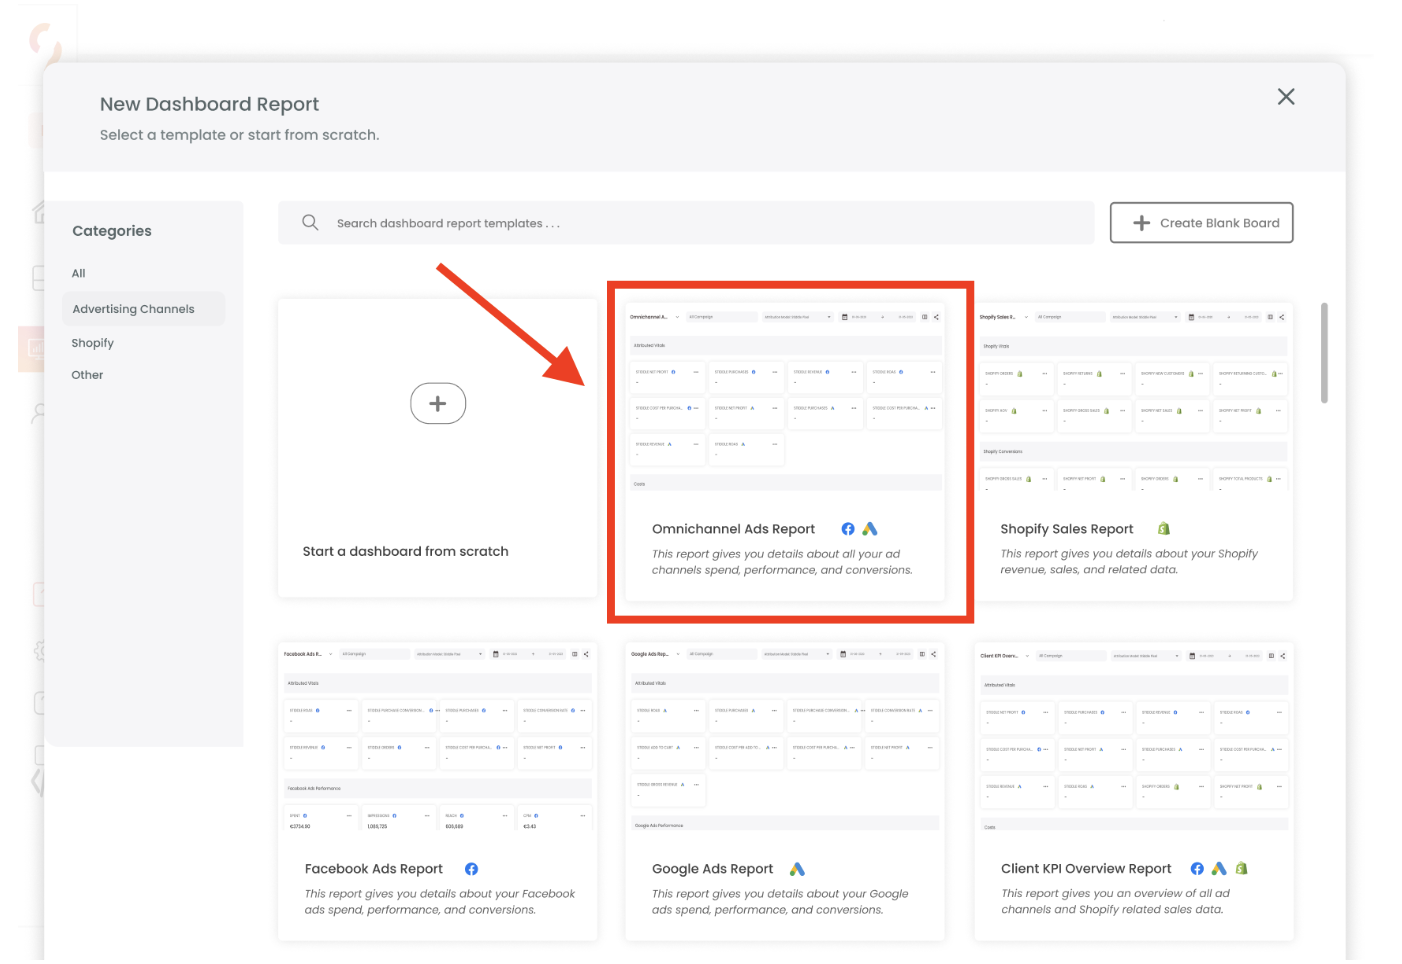
Once you’ve selected a template, you’ll be able to configure it according to the metrics and sections you want to display.

Important Please note that some metrics may not display in your dashboard, this is because the metrics configured in the template may not have any data in your ad account for the selected date range. Simply increase the date range to “Maximum” or "Stiddle Max" to see your historical data.
Creating a new dashboard from scratch
To create a dashboard from scratch, simply navigate to the “All Dashboards” page and select “Start from scratch”.

Configuring and Sharing your Analytics Dashboard
Once you’ve created a new blank dashboard, you’ll see a blank screen with a section and an “untitled” name.
First navigate to the top left of the page, hover over the “untitled” text and select the edit button.

Give the dashboard a new name and select “Save”.

Adding a new section
Sections are a way to keep your widgets organized. Widgets are added to sections and sections are added to your dashboard. Sections can be named and moved within your dashboard.
To add a new section, simply navigate to the top right side of the page and select the new widget button. Once selected, you’ll see a dropdown menu of available widgets. Simply click to drag and drop the section to your dashboard.

Once the section is added to the dashboard, you’ll see it is named “Untitled” by default. Simply hover over the text and select the edit button to change and save the name.

Deleting a section
To delete a section, simply hover over the right side of the section and select the trash icon.

Adding a new metric
First, navigate to the right and select the new widget button. Next, simply drag and drop the “Metric” widget over to the section. Once dropped, you’ll see options to configure the widget.

Configuring a new widget
After adding a new widget to a section, you’ll be prompted to configure the widget by selecting the metric you want it to display.
To configure your new widget, simply navigate to the left side menu of the widget configurator and select which integration you want to view data for.

Important Please note that “Blended Metrics” are the calculation of all ad channel metrics added together. For example, “Blended Impressions” would be the total Facebook and Google impressions added together.
Once selected, you’ll notice two options to display data from the selected channel - “Original” and “Attributed”.
Original - Original metrics are the standard metrics reported and synced directly from the channel connector. These are not attributed or often accurate and are a great way to compare between the Stiddle attributed metrics.
Attributed - Attributed metrics are tracked and calculated from the Stiddle Pixel. These are accurate and attributed metrics with up to 100% accuracy. These metrics are great to gain a comprehensive understanding of your data, giving you the confidence you need to scale.
Select either “Original” or “Attributed”, then select the metric listed below that you want to view in your dashboard and select “Apply”.

You’ll then see the metric added to your dashboard under the section you added it to.

Important Please note that at any time you can click to drag and drop any of your metrics to reposition within a section or move between different sections.
Editing a metric widget
To change an existing widget's metric, select the menu (three dots icon) on the upper right side of the widget, then select “Change Metric”.

You’ll then be prompted to reconfigure the widget by selecting a new metric. Simply select “Apply” after selecting your new metric.

Deleting a metric widget
To delete an existing metric widget, select the menu (three dots icon) on the upper right side of the widget, then select “Delete”. This will remove your widget from the dashboard.

Expanding a Widget For More Details
To expand a widget, simply select it or click on the three dot option, and "View Details". Once selected, you'll see an expanded view of the widget with options to configure the visualization type (graph, bart chart, etc.), colors, date, name, and groupings. After making any changes, simply select the "Save" button to see the changes reflected in your dashboard.
Changing a Widget's Visualization Type (Graph, Bar Chart, etc.)
There are several visualization types to choose from, here's a list: number value, bar chart, area graph, line graph, map, pie chart, and table. Different visualization options are shown depending on the type of metric selected. To change the visualization type, select a widget, then click on the color wheel icon to see different visualization options.
Resizing a Widget
To resize a widget, simply select and drag the small arrow, located in the lower right corner.
Selecting a specific campaign, ad set, or ad to view
To select a specific campaign, ad set, or ad to view in your dashboard, navigate to the top of the page and select “All Campaigns”.

Next select an ad channel, then select a campaign, ad set, or ad to view.

You’ll then see the data on your dashboard change in reflection to the campaign, ad set, or ad you’ve selected.

At anytime you want to view the data for all ad channels, simply navigate back to the selector and select “All”.

Important Please note that when a specific ad channel is selected, any widgets you have on the dashboard that is not the selected ad channel will not show any data. To view the data for all widgets, regardless of the ad channel, simply navigate back to the selector and select “All”.
Selecting a date range
Easily select a date range to view your dashboard data for a specific period of time. Stiddle syncs historical data as far back as 37 months for ad channels (Facebook & Google). Other integrations may have longer historical data ranges.
To select a date range, navigate to the top right of the dashboard and select the date icon.

Once selected, you are able to choose from one of the date ranges displayed, a custom date can be applied after selecting a campaign, ad set, or ad. Select apply.

Understanding The Stiddle Max Date Option
What is the Stiddle Max date option? The Stiddle Max date option is very important to understand! To view the maximum date range from your attributed metrics reported by Stiddle, you'll need to select the Stiddle Max date option. The standard Maximum option won't show any results for Stiddle attributed metrics.
Remember, the Stiddle Max option is showing data by selecting from the start date that the Stiddle Pixel begun tracking your ads. You can find this start date in the campaign table, the metric is called "Start Date". Please note that the start date may be different for each ad channel connected.
Comparing a date range
Comparing date ranges is a great way to compare past performance.
To compare date ranges, select a specific campaign, ad set, or ad, then navigate to the date selector and select the “Compare” toggle switch on the date selector.

Once selected, simply hover over the compared percentage of change on the metric widget to see more details.
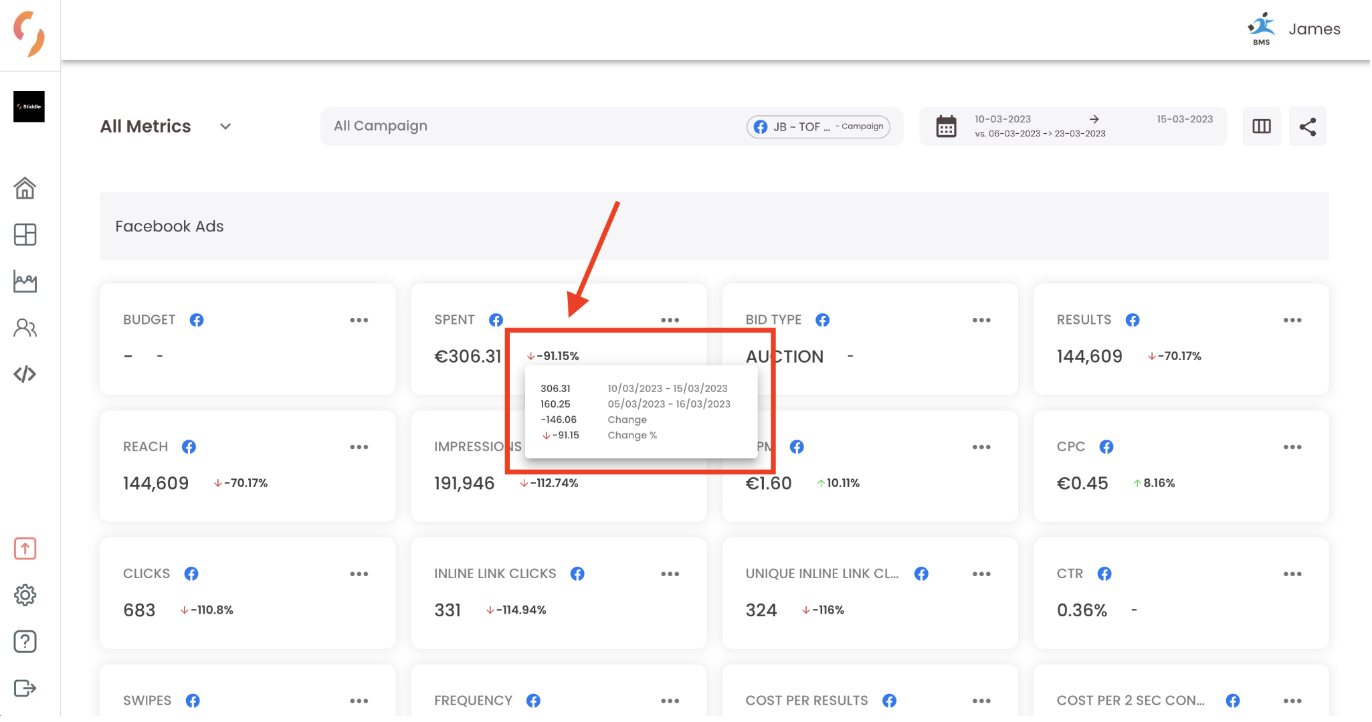
Important Please note that if there is no data found for the selected date range, no data will display in the metric widget. To view all historical data, simply disable the compare toggle and select “Maximum” or "Stiddle Max" at any time.
Adding your logo to the dashboard
Easily whitelabel your dashboard with your workspace logo. Your workspace logo can be updated within your workspace settings.
To enable your workspace logo on your dashboard, navigate to the top right of the dashboard, select the share icon, then select “Share Link”.

From here, simply select “Add Workspace logo to this board” and refresh your page.

You’ll now see your workspace logo added to the top left corner of your dashboard.

Once enabled, your workspace logo will appear on your dashboard when it’s shared, downloaded, or printed.
Sharing your dashboard with a live link
Sharing your dashboard is a quick and easy way to give clients and stakeholders a live view of your performance. When shared, the dashboard will automatically be synced in real time whenever there is a change in metrics or configuration. Shared dashboards are public and not editable by the viewer. To allow team members to edit your dashboard, you'll need to add them as a workspace member in workspace settings.
To share your dashboard, simply navigate to the top right of the dashboard, select the share icon, then select “Share Link”.

Next, select “copy” and start sharing your live dashboard link.

Important Please note that currently there is no way to revoke access to the shared dashboard after sharing. Once the link is shared, anyone with the link can view your dashboard. If needed, the easiest way to stop sharing the dashboard is to duplicate and delete the dashboard that is shared. Then you’ll have a new dashboard with a new link.
Printing your dashboard
Printing and downloading your dashboard as a PDF is easy.
To download and print your dashboard, navigate to the top right of the dashboard, select the share icon, then select “Print PDF”. Your PDF will begin downloading.

Important Please note that for the best view select landscape when exporting.

Favoriting a dashboard
Favoriting a dashboard allows for quick and easy access to a dashboard in two ways - when selecting a campaign, ad set, or ad within the campaign manager, and when selecting the “My Favorite Board” from the navigation menu.
To select a dashboard as your favorite, navigate to the “All Dashboards” page, located in the left navigation.

Find the dashboard you want to favorite, then select the dashboard menu (three dots).
Select “Mark Favorite”.

Once marked as favorite, you’ll see the dashboard move to the first position on your “All Dashboards” page. Your favorite dashboard is indicated by the gold star icon next to the name.

To quickly access your favorite dashboard, simply select “My Favorite Board” from the left navigation. You’ll then be directed to your favorite dashboard.

To see analytics from the Stiddle Campaign Manager, simply hover over a campaign, ad set, or ad, then select the “Analytics” button.

Once selected, you’ll see the select campaign, ad set, or ad enabled in your favorite dashboard for quick analysis.

Deleting a dashboard
Deleting a dashboard is easy, however do keep in mind that once a dashboard is deleted - it’s gone forever!
To delete a dashboard, navigate to the “All Dashboards” page, find the dashboard you want to delete, then select the dashboard menu (three dots).
Select the “Delete” from the dropdown. That’s it - all deleted!

Duplicating a dashboard
Duplicating a dashboard is quick and easy.
To duplicate a dashboard, navigate to the “All Dashboards” page, find the dashboard you want to duplicate, then select the dashboard menu (three dots).
Select the “Duplicate” from the dropdown. You’ll see your new duplicated dashboard added to your “All Dashboards” page with the same name plus the word “copy”.

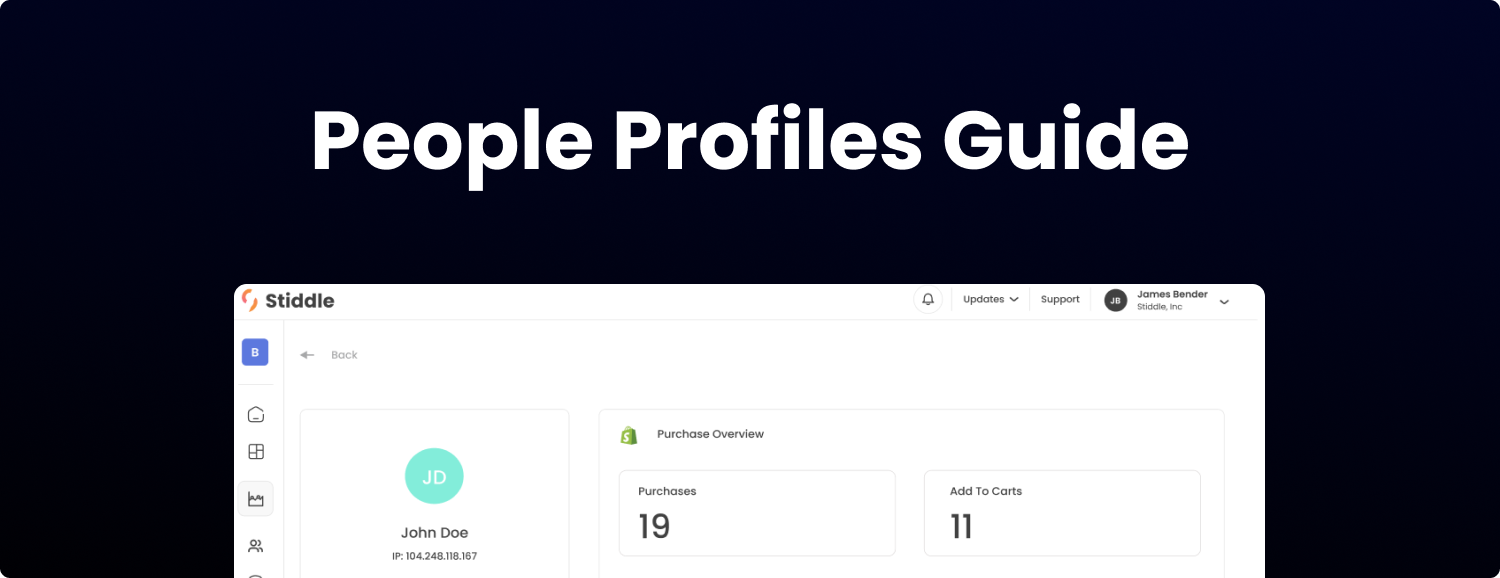
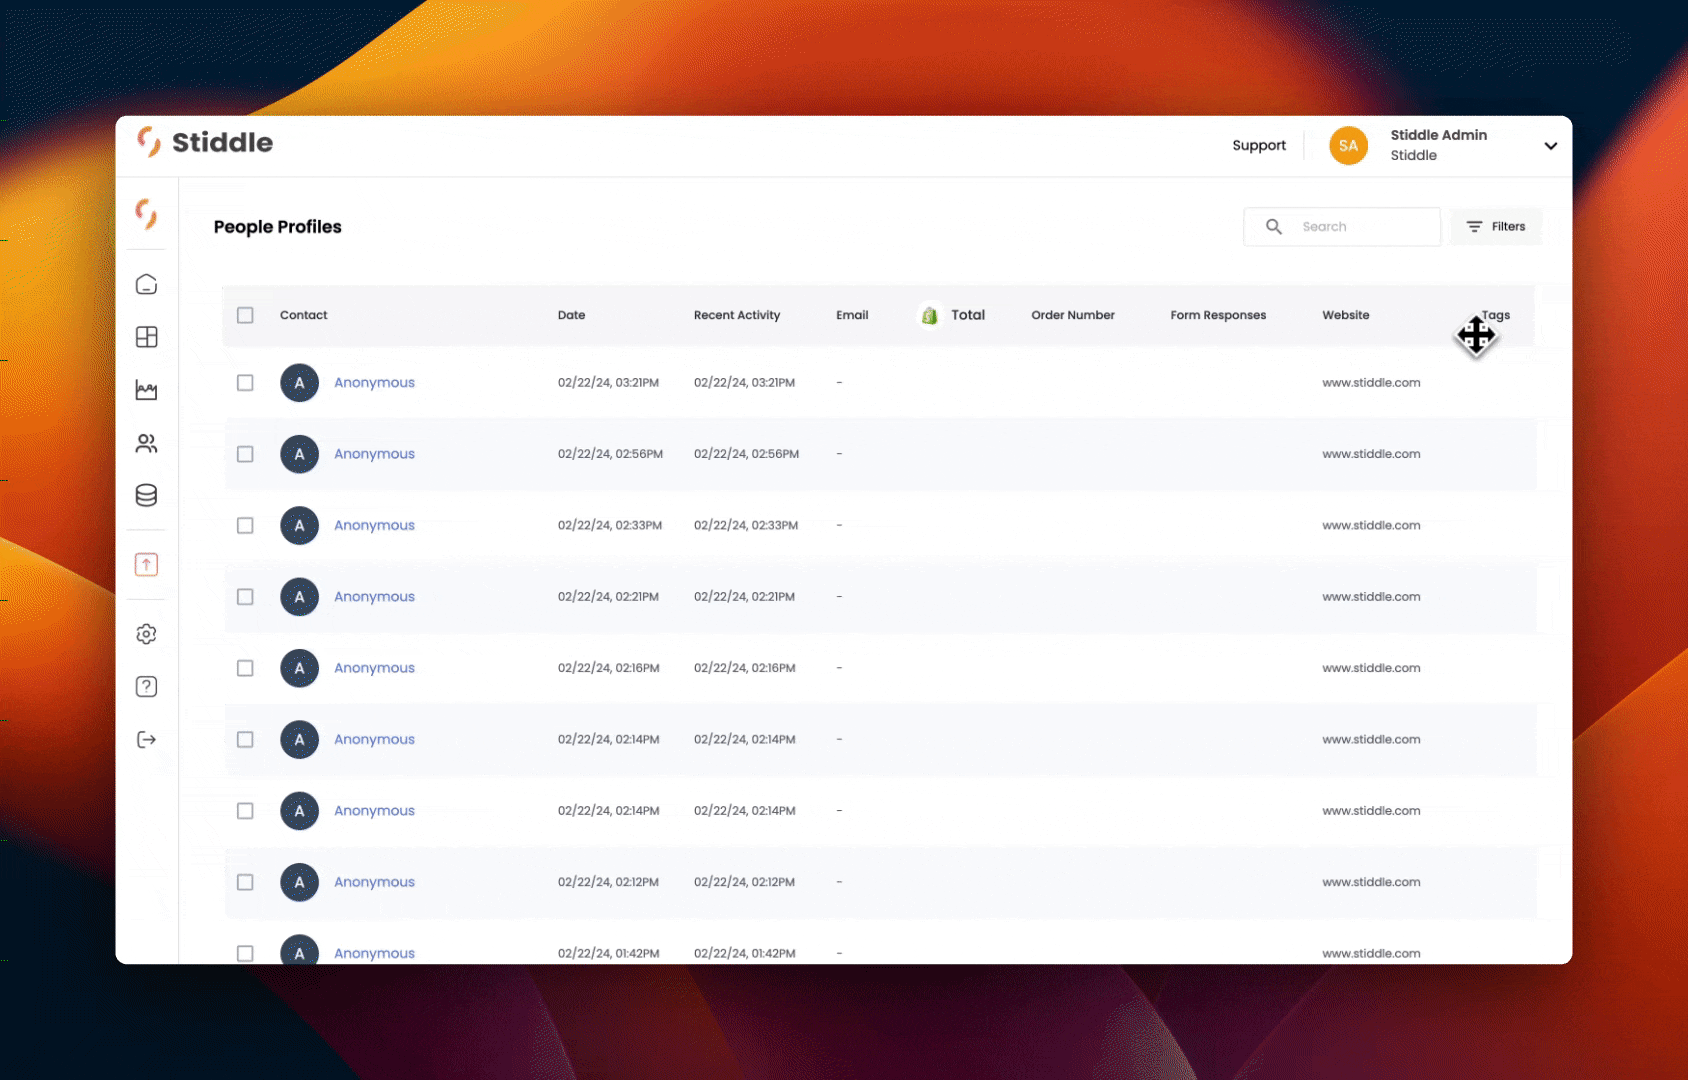
Everything you need to know about Stiddle Profiles
Stiddle Profiles are created for every website visitor - even before they make a purchase or fill out a website form. Profiles are used for identity resolution and attribution, this allows Stiddle to track every website visitor and build a detailed profile, allowing for a complete user journey. Anytime a website visitor converts into a customer, Stiddle will know which ad was responsible for the conversion and attribute the purchase to the correct ad, leaving you with an accurate and transparent timeline of every action a customer took, leading to the purchase.
Types of Profiles
Anonymous ~ These are people that view your website or store, tracked by the Stiddle Pixel.
Known ~ These are people that the Stiddle Pixel has tracked from your website or store and have entered some type of identifiable information, such as a purchase or form submission.
Imported ~ These are customers that have been imported into Stiddle from Shopify or a CSV.
Previewing a profile
To preview a specific profile, navigate to the “Profiles” page, located on the left side navigation menu.
From here, you’ll see a complete overview of every website visitor and customer since the time you installed the Stiddle Pixel.

Profile Filters
Profile filters are great way to segment through your website and customer data. See the instruction in the video below.

Saving & Selecting Commonly Used Profile Filters
Easily save commonly used profile filters. See the instruction in the video below.
Quick View ~ Profile Orders
See a quick overview of which products customers have purchased by selecting the number under the “Order Number” column.


Select a profile to learn more details about that customer and their conversion journey.

Default Attributes Stiddle Profiles Have
- Purchases
- Add to carts
- AOV
- Avg. CPC
- LTV
- Page views
- Sessions
- First name
- Last name
- Phone number
- Landing page
- Page converted from
- Source
- Date added
- Unique Stiddle Pixel ID
- Location
- IP address
- Activity timeline (events the Stiddle Pixel collects)

Understand the complete journey of a visitor / customer
To see the complete journey of every profile, find and select a profile, then scroll down to the “All Activity” section.

Default Activity The Stiddle Pixel Collects Automatically
- Home page view
- Collection page view
- Product page view
- Products added to cart
- Shopify purchase
- Facebook ad
- Google ad
- Organic Sources (Klaviyo, email, etc.)
- Form Submissions (legacy - temporarily disabled)
Simply click on one of the actions in the activity timeline to expand and view more details. In the below example, you can see which Facebook campaign, ad set, and ad was responsible for the most recent purchase. Simply select the campaign, ad set, or ad to view more details inside the Stiddle campaign manager.

Merged & anonymous profiles - What are they? How to find them?
When a visitor visits from multiple different devices, browsers, or uses different checkout details, they are created into an anonymous profile. Once the visitor purchases a product or has a common unique identifier (email/phone), they become merged into a single profile. This gives you a single source of truth for the customer’s journey.
To find the merged profiles of a customer, simply navigate to the “All Profiles” page, and select the customer profile you want to view.
Once inside the customer profile, scroll down and select “Merged Profiles”.

A list of all the profiles associated with that customer will be displayed with any additional information collected by the previous merged profiles.

Important Please note that once a profile is merged, the anonymous profile will no longer exist, instead the information associated with that profile will be merged into a single profile.
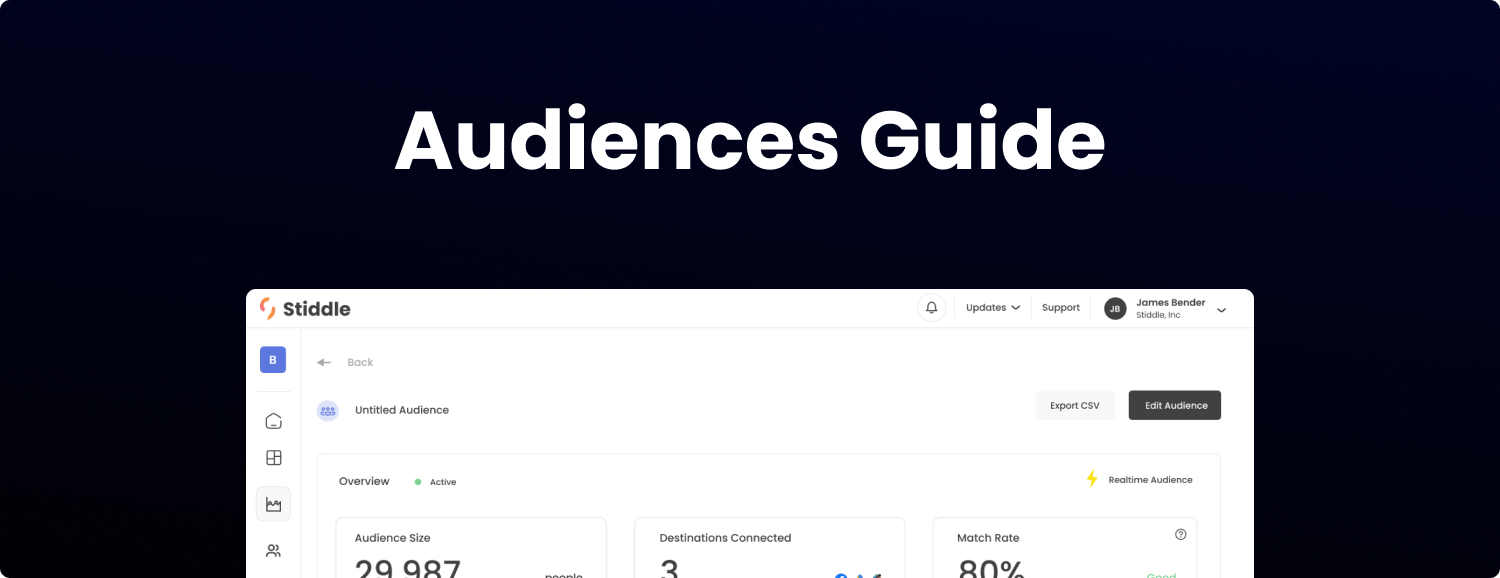
Everything About Stiddle Audiences (Beta)
Build audiences to reach your target customers and maximize impact using the most up-to-date and accurate data in Stiddle profiles.
Creating a new Audience From Profiles
Creating a new audience or adding new people to existing audiences can be done from profiles. Navigate to profiles, apply filters, then select the check boxes (or all) for each profile you'd like added to the audience.

Next, you'll see a button "Add to audience". You can add to an existing audience by selecting, or create and name a new audience.

At anytime, you can view your audiences by navigating to the audiences page from the left navigation.

You'll see an overview of each audience. You can select an audience to view everyone that's currently in it, change the name, or export.


Exporting Audiences To CSV
To export an audience to a CSV. Navigate to your audiences page, select an audience, then select "Export CSV".

More Coming Soon!
- Realtime Audiences - Set rules to update audiences automatically when profile attributes or activity is updated
- Audience Syncing Destinations - Facebook Ads, Google Ads, Klaviyo, Zapier